Proxy Farm on OpenWRT Router: A Step-by-Step Build from Scratch to Success
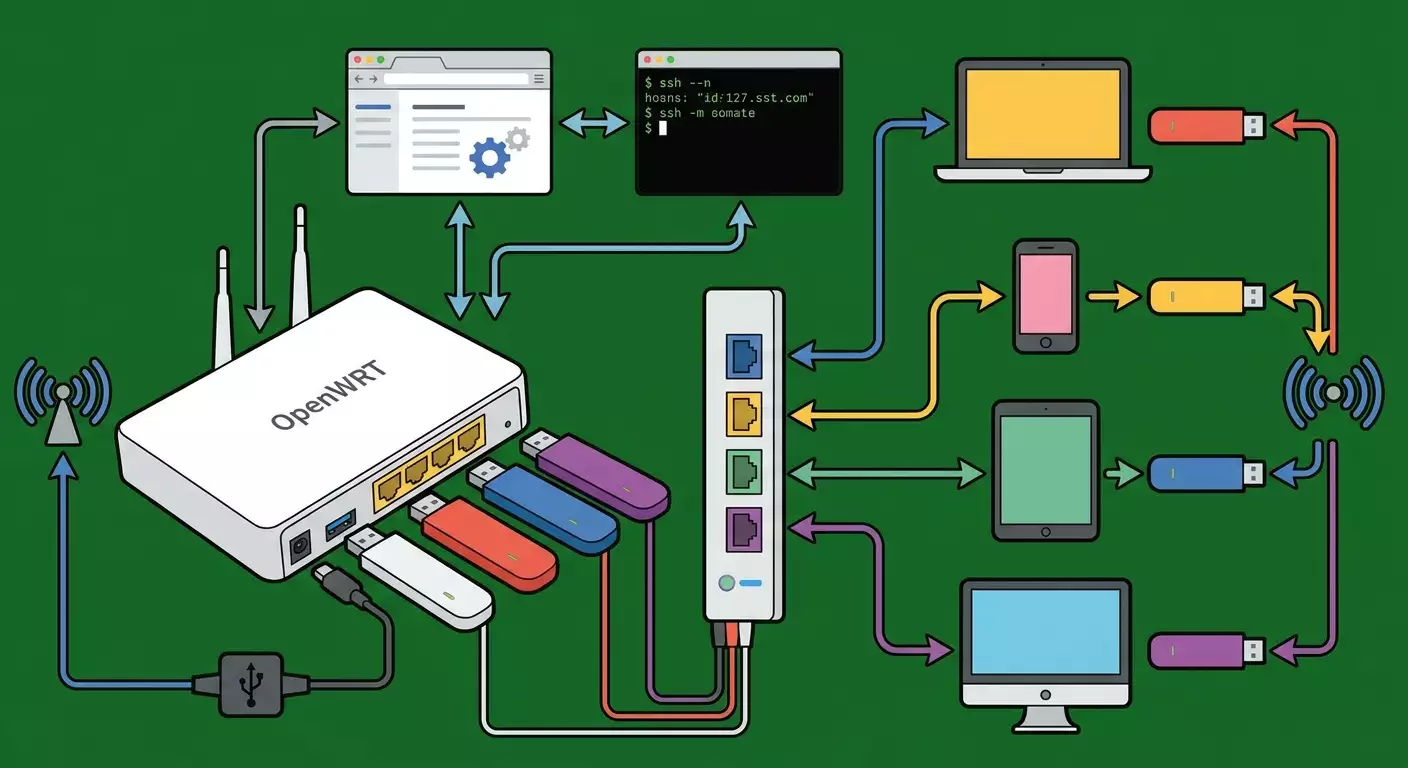
Table of contents
- Introduction
- Preparation
- Basic concepts
- Step 1: why openwrt for mobile proxies
- Step 2: what you need (compatible router, modem)
- Step 3: installing openwrt
- Step 4: configuring the modem and network access
- Step 5: raw-ip or bridge mode
- Step 6: connecting proxy software
- Checking the results
- Common issues and solutions
- Additional features
- Faq
- Conclusion
Introduction
In this step-by-step guide, you'll build a fully operational proxy farm on a router with OpenWRT and USB modems. By the end, you'll have one or several authenticated HTTP(S) proxies, each using the mobile connection of a specific modem. You will learn how to properly select hardware, install OpenWRT, configure mobile network connectivity in QMI or MBIM modes, enable raw-IP if needed, deploy 3proxy, bind each proxy to its own interface, and check results using standard methods. Additionally, you'll find out how to scale the configuration, automate modem restarts, and monitor stability.
This guide is written for advanced users, but every step is detailed, using simple language and without leaving out obvious actions. Even if you haven’t worked with OpenWRT before, you’ll still be able to follow the instructions step-by-step. For experienced readers, there are extended options, optimizations, and a section on common issues.
Before you start, it's useful to know some basics: how to access the router's web interface (LuCI), how to open an SSH client and enter commands, how to flash firmware, and how to read system logs. We'll explain key commands and indicate what to click in the interface. Everything will take 3-6 hours: longer if you're flashing a device for the first time and building a farm with several modems, and shorter if you already have OpenWRT and one modem.
Tip: If you want to test the idea more quickly, start with one modem and one proxy port. Once everything is working, scale up to 2-8 modems.
⚠️ Attention: Use proxies strictly within the laws of your country and the terms of service of your carriers. This guide does not contain or imply methods to bypass blocks, illegitimate practices, or interference with third-party networks.
✅ Verification: By the end of the guide, you will have a list of available proxies in the form: host:port with username and password, verified through a browser or curl. Each proxy will connect to the internet via its own mobile interface and have a separate external IP address from the operator.
Preparation
Before you begin, gather the necessary tools, software, and accesses. This will help you avoid downtime and unnecessary restarts.
Required Tools and Accesses
- A computer or laptop with an Ethernet port or USB-Ethernet adapter.
- Access to the router via an Ethernet cable (preferably directly into the LAN port).
- An SSH client to connect to OpenWRT at 192.168.1.1 (for example, the built-in terminal in Linux or Windows Terminal). A browser is used for the web interface.
- Administrator rights on the router (root in OpenWRT).
System Requirements and Compatibility
- A router supporting OpenWRT and USB 2.0 or 3.0 for connecting modems. For 2-8 modems, use external powered USB hubs.
- At least 16 MB of free flash memory in the router and RAM from 128 MB (256-512 MB recommended for multiple modems and 3proxy).
- One or more SIM cards with an active data plan. Learn the APN from your carrier.
- USB modems supporting QMI/MBIM/NCM or HiLink mode. Popular options include: Quectel EC25/EP06/EM12, Huawei E3372 (Stick and HiLink), ZTE, Sierra Wireless. QMI/MBIM modems are preferred for a stable farm.
What to Download and Install Ahead of Time
- The OpenWRT firmware image for your router model (Firmware Download section on the official OpenWRT site). Choose factory for flashing from stock firmware and sysupgrade for updating to OpenWRT.
- Package list: luci, luci-proto-qmi, luci-proto-mbim, luci-proto-ncm, uqmi, umbim, comgt-ncm, kmod-usb-net, kmod-usb-net-qmi-wwan, kmod-usb-net-cdc-mbim, kmod-usb-net-cdc-ncm, kmod-usb-serial-option, usb-modeswitch, 3proxy. We'll show you how to install them using opkg.
- A text editor for editing configs, such as the built-in vi in OpenWRT or a local editor with SSH copy-pasting.
Backup and Rollback Plan
- Connect your computer to the router via an Ethernet cable.
- Open a browser and go to 192.168.1.1. If OpenWRT is already installed, enter your password and go to System → Backup/Flash Firmware.
- Click Generate archive to download a backup of the current configuration.
- Save the archive on your computer with a clear name and date. This will allow for a quick return to a working state.
⚠️ Attention: Before flashing, ensure that you have access to the router's recovery procedure (e.g., recovery mode or TFTP). This will save the device in case of a failed flash.
✅ Verification: Ensure that the backup file is downloaded and opened as a tar archive, with configs visible inside. Verify that you know how to access your router's Recovery mode according to the manufacturer's instructions.
Basic Concepts
Key Terms Simplified
- OpenWRT — an open-source firmware for routers that gives complete control over networks, packets, and interfaces.
- Mobile Modem — a USB device that connects the router to the mobile networks (3G/4G/5G) and provides an IP address.
- QMI/MBIM/NCM — protocols by which the modem communicates with the router. QMI and MBIM are usually more stable and faster for LTE, while NCM is often used with some Huawei/ZTE devices.
- raw-IP — a mode in which data frames are transmitted without Ethernet headers. It is required for many QMI modems; enabling it increases compatibility.
- HiLink — a mode of some modems where the modem itself does NAT and gives the router a local IP like a regular network card. It is easier to set up but offers less flexibility.
- Proxy — a program that accepts requests on the router and sends them to the internet. We will set up an authenticated HTTP(S) proxy.
How It Works
OpenWRT sees one or more USB modems as separate network interfaces. Each interface receives a mobile IP from the carrier. The proxy server runs on the router and is configured so that outgoing traffic from a specific port goes through the designated modem. As a result, you get a set of addresses in the form of host:port, with each port corresponding to its mobile IP.
What to Understand Before Starting
- Each modem will have its own interface (e.g., wwan0, wwan1, etc.). Their names and numbers may differ depending on the connection order.
- For QMI/MBIM modems, the raw-IP parameter is often needed; without it, the connection comes up, but traffic does not pass.
- In HiLink mode, the modem handles NAT itself. It is simpler but more challenging to reliably bind the proxy port to a specific SIM with multiple modems.
- It is essential to correctly configure firewall zones and routing tables to separate the traffic for each proxy.
Tip: If you plan to have more than 3-4 modems, prepare an active USB hub with a separate 5V 3-5A power supply in advance. This will resolve 90% of stability and power overload issues.
Step 1: Why OpenWRT for Mobile Proxies
Goal of this step: Confirm consciously that OpenWRT is a suitable platform for your task and understand the advantages it offers specifically for mobile proxies.
- Define your task. For instance: you need 2-6 independent mobile HTTP(S) proxies for testing, analytics, integration with your services.
- Match OpenWRT's capabilities: flexible routing, QMI/MBIM support, firewall, packages, scripts, cron, and the simple admin interface LuCI and SSH.
- Evaluate the benefits against PC setups: lower power consumption, compactness, reliability, auto-start, and cost-effectiveness for scaling.
- Understand the limitations: weaker CPU than x86; less RAM and flash; a more careful approach to logs and monitoring.
Important Points: OpenWRT runs stably for months without reboots when properly configured. It is easier to replicate and update. Many mobile modems are tested specifically with OpenWRT.
✅ Verification: If your goals are stable mobile HTTP(S) proxies with route control, OpenWRT is suitable. If you need complex L7 features and real-time DPI analytics, assess the router's CPU or consider x86.
Step 2: What You Need (Compatible Router, Modem)
Goal of this step: Identify and prepare a compatible router, USB modems, hub, SIM cards, and power to build a farm without bottlenecks.
Choosing a Router
- Check if your router supports OpenWRT in the latest version (stable branch 23.05.x or newer). Recommendations: models with Mediatek or Qualcomm chipsets with 128-256 MB RAM and a USB port.
- If you plan to use 4+ modems, look for devices with USB 3.0 and gigabit Ethernet. CPU performance is crucial for 3proxy and NAT.
- Ensure the router has an accessible recovery procedure (Recovery, TFTP). This is critical for safe flashing.
Choosing Modems
- For LTE, prefer modems with QMI/MBIM: Quectel EC25/EP06/EM12, Sierra Wireless, some ZTE models.
- The Huawei E3372 comes in Stick and HiLink variants. For routing control, Stick is preferred, but HiLink is simpler during the first setup.
- Check with the carrier for support of the required LTE/NR bands. Antennas and signal strength are important for stability.
SIM Cards and APN
- Activate the SIM cards ahead of time and disable the PIN code during the initial setup to avoid connection blocking.
- Check the APN with the carrier: example apn.example. If a username and password for the APN are required, prepare them.
Power and Hubs
- Use a powered USB hub for 2+ modems.
- Check cables: short, high-quality USB cables reduce losses and interference.
Tip: Physically label each modem and its corresponding hub port. This will help you quickly link interfaces wwan0, wwan1 to actual SIM cards.
✅ Verification: You have a router with USB, compatible modems, an active hub, SIM cards with known APN, and stable power. Everything is ready for flashing and configuration.
Step 3: Installing OpenWRT
Goal of this step: Install or update OpenWRT on the router and ensure access to the LuCI web interface and SSH.
Flashing from Stock OS
- Connect the PC to the router's LAN port via cable.
- Open a browser and go to the stock firmware administrator interface of the router.
- Locate the firmware update section. Choose the factory image of OpenWRT for your model.
- Initiate the flashing process. Do not disconnect the power and wait for the reboot.
First Access to OpenWRT
- Open 192.168.1.1 in your browser. Set a password for root upon first access to LuCI.
- Go to System → Backup/Flash Firmware and ensure you see the OpenWRT version and available sections.
- Connect via SSH: enter in the terminal ssh root@192.168.1.1, accept the server key, and enter the password.
Updating Packages
- Run the command: opkg update.
- Install LuCI and required protocols (if they are not present): opkg install luci luci-proto-qmi luci-proto-mbim luci-proto-ncm.
- Install drivers and utilities: opkg install kmod-usb-net kmod-usb-net-qmi-wwan kmod-usb-net-cdc-mbim kmod-usb-net-cdc-ncm kmod-usb-serial-option usb-modeswitch uqmi umbim comgt-ncm.
⚠️ Attention: After installing modem packages, reboot the router with the command reboot. This ensures correct initialization of USB devices by the kernel.
✅ Verification: In LuCI, you can see System → Software with installed packages. In SSH, the command dmesg shows that the USB subsystem is ready. The OpenWRT version is current, and access to 192.168.1.1 is stable.
Step 4: Configuring the Modem and Network Access
Goal of this step: Connect the USB modem, detect it correctly in the system, create an interface for internet access, and verify that traffic is going through.
Connecting the First Modem
- Insert the SIM card into the modem. Use a SIM without a PIN code for the first setup.
- Connect the modem to the USB port of the router or into the powered USB hub, which is connected to the router.
- Wait for 10-30 seconds. Execute in SSH: dmesg | tail — you should see lines about the new USB device and network interface (e.g., wwan0 or cdc-wdm0).
Creating a QMI/MBIM/NCM Interface in LuCI
- Open LuCI and go to Network → Interfaces → Add new interface.
- Enter a name, such as LTE1.
- In the Protocol field, select QMI Cellular (or MBIM Cellular, or NCM depending on the modem).
- Click Submit. Specify the device: for QMI, this is usually /dev/cdc-wdm0, for MBIM — also cdc-wdm0, for NCM — a network adapter like wwan0 or usb0.
- Type in the APN, for example apn.example. If a username/password for the APN is required, fill in those fields.
- Disable the PIN code during the first startup. If a PIN is required, enter it in the respective field.
- Save and apply the settings (Save & Apply).
Checking the Connection
- Go to Status → Overview. Find your new interface LTE1 and its status. An IP address should be acquired from the carrier.
- Execute in SSH: uqmi -d /dev/cdc-wdm0 --get-data-status for QMI or mbimcli -d /dev/cdc-wdm0 -p --query-ip-configuration for MBIM. It should show connected and IP.
- Check internet access: opkg update — if it completes successfully, the router is online.
Tip: If the IP is not issued, try restarting the interface using the Restart button in Network → Interfaces next to LTE1, then check System → System Log for error messages related to the APN or network registration.
✅ Verification: The LTE1 interface has an IP address, and ping 8.8.8.8 or opkg packages are functioning. This means the modem and network are correctly configured.
Step 5: raw-IP or Bridge Mode
Goal of this step: Enable raw-IP for QMI/some NCM modems or select a simpler bridge/HiLink mode, understanding the trade-offs.
When raw-IP Is Required
- Many QMI modems only correctly transmit data in raw-IP mode. Otherwise, the interface comes up, but packets do not flow.
- In OpenWRT, the raw-IP parameter for QMI is set in the interface or device settings.
How to Enable raw-IP
- In LuCI, open Network → Interfaces → LTE1 → Edit → Advanced.
- Check the box or set the raw IP mode parameter (if available). The wording may differ in different versions of LuCI.
- Save and apply. Restart the LTE1 interface. If the parameter is unavailable, set it via UCI: uci set network.LTE1.raw_ip='1'; uci commit network; /etc/init.d/network restart.
Bridge Mode (HiLink)
- If using a HiLink modem, it will establish the connection itself and provide the router with an IP via DHCP on an interface such as eth1 or usb0.
- Create a DHCP Client type interface instead of QMI/MBIM, specify the corresponding device, and apply the config.
Important Points: HiLink is easier to start but challenging to ensure the proxy port consistently binds to a specific modem with multiple devices. QMI/MBIM provides better route and performance control.
Tip: For a farm with 3+ modems, QMI/MBIM with raw-IP when necessary is preferred. For single-modem startups, you can use HiLink and then transition to QMI/MBIM.
✅ Verification: After enabling raw-IP, pings and package lists load stably. No frame format or timeout errors remain in System Log.
Step 6: Connecting Proxy Software
Goal of this step: Install and configure 3proxy so that each proxy port uses the required mobile interface. Implement authorization and basic security.
Installing 3proxy
- Update the package index via SSH: opkg update.
- Install 3proxy: opkg install 3proxy.
- Ensure the binary is installed: which 3proxy should return a path, e.g., /usr/bin/3proxy.
Basic Configuration for One Proxy
- Create the file /etc/3proxy/3proxy.cfg. If the file does not exist, 3proxy will create it on its first run; it's recommended to create it manually.
- Add credentials: users user1:CL:pass1. This line is for basic HTTP authorization.
- Limit access: allow user1. This rule allows only user1 to access the proxy.
- Set the internal listening address: internal 0.0.0.0. This allows connections on all LAN interfaces.
- Set the external interface: external wwan0. Replace with your modem interface, e.g., wwan0 for LTE1.
- Launch the HTTP proxy on port, e.g., 3128: proxy -p3128 -a. The -a key enables authentication support.
- Save the file and start the service: /etc/init.d/3proxy enable; /etc/init.d/3proxy start.
Multiple Proxies for Multiple Modems
- Connect the second modem and configure the second interface (for example, LTE2 with device /dev/cdc-wdm1 and name wwan1).
- Add an account for the second proxy: users user1:CL:pass1, user2:CL:pass2.
- Create a separate block for the second port: allow user2; external wwan1; proxy -p3129 -a. Thus port 3129 will route through wwan1.
- Restart 3proxy: /etc/init.d/3proxy restart.
Firewall and Route Binding
- Ensure that interfaces LTE1, LTE2 are in the wan zone or a separate zone with appropriate masquerades (NAT). In LuCI: Network → Firewall → Zones.
- If you are using external interfaces in 3proxy, additional routing policy is not mandatory but recommended for guarantees. Use policy-based routing based on the originating address of 3proxy or fwmark labels.
- For OpenWRT, the mwan3 package is convenient for managing multiple wan interfaces. However, for a farm where strict port-to-interface binding is important, use external in 3proxy and static ip rule rules.
Tip: For simplicity, start with the external mechanism in 3proxy. If TCP/UDP port group routing is required later, add iptables mangle rules and ip rule.
✅ Verification: Connect to the proxy on port 3128 using username user1 and password pass1. Execute curl -x http://user1:pass1@ROUTER_LAN_IP:3128 https://ifconfig.me and ensure that the external IP matches the interface LTE1. Then check port 3129 and compare the IP for LTE2.
Checking the Results
Goal of this step: Ensure all components are working, that each proxy connects to the internet through its modem, and that performance and stability meet expectations.
Checklist
- Access to LuCI and SSH at 192.168.1.1 works.
- Interfaces LTE1, LTE2, etc., come up and receive IPs from the operator.
- 3proxy is running and listening on ports (for example, 3128, 3129).
- Proxy authorization is requested and passes.
- The external IP on each port is different (for different SIMs) or corresponds to the required modem.
How to Test
- Check the ports: from a PC, execute telnet ROUTER_LAN_IP 3128. A TCP connection should establish.
- Check external IPs: curl -x http://user1:pass1@ROUTER_LAN_IP:3128 https://ifconfig.me and similarly for 3129 with user2.
- Check speed: through curl, download a test file and assess bandwidth, or use speedtest-cli through the proxy (if possible).
- Check session persistence: open a long connection through the proxy and ensure it does not break for several minutes.
Tip: If outside access is not planned, limit proxy access to the local network only. In 3proxy, you can listen on internal 192.168.1.1 and open only the necessary ports in LAN.
✅ Verification: External IPs are logged and differ between ports. opkg packages and pings are stable. 3proxy logs do not contain persistent connection errors.
Common Issues and Solutions
- Problem: Interface LTE1 comes up but internet does not work. Cause: raw-IP for QMI not enabled or incorrect APN. Solution: Enable raw-IP in the interface settings, check APN, restart the network.
- Problem: 3proxy is running, but traffic is routing through the wrong modem. Cause: external not set for the required interface or a conflict with routing rules. Solution: Set external wwanX, restart 3proxy, add ip rule by fwmark if necessary.
- Problem: With two or more modems, traffic sometimes drops. Cause: Insufficient power for the USB hub, modem overheating, weak signal. Solution: Use a powered hub, high-quality cables, antennas, and reduce the number of modems on one hub.
- Problem: Cannot access LuCI after flashing. Cause: The browser caches old data, or the router did not apply the address. Solution: Open in incognito mode, check network settings on the PC, reset the router if necessary via the manufacturer's instructions.
- Problem: Proxy is inaccessible from your network. Cause: Firewall blocks the port or 3proxy is not listening on the right address. Solution: Check internal in 3proxy.cfg, open the port in the LAN Zone, restart the service.
- Problem: The operator changes the IP too infrequently or has fixed it. Cause: Tariff features, CGNAT, carrier policy. Solution: Reconnect the interface, periodic IMSI changes are not provided; check the tariff, use different SIMs, set a forced ifdown/ifup schedule.
- Problem: opkg does not install packages. Cause: No DNS/route or repositories are blocked. Solution: Check DNS in Network → Interfaces → LAN, temporarily add 8.8.8.8 as the DNS server, and ensure internet access is available.
Tip: For diagnosing network issues, use tcpdump on the wwan0 interface. Install tcpdump: opkg install tcpdump, then tcpdump -i wwan0 host 8.8.8.8 to see if traffic is going out.
Additional Features
Scaling to 3-8 Modems
- Label the interfaces: name them LTE1, LTE2, LTE3 in LuCI and track which modem is connected to which device /dev/cdc-wdmX.
- Create a separate block for each modem in 3proxy: its own user, its own port, its own external.
- Adjust the firewall: each WAN zone should allow outgoing traffic and NAT. If using separate zones, check forwarding from LAN to each zone.
Auto-Reconnect and Scheduler
- Create a script that checks external connectivity through a specific interface every N minutes. If there is no response, run ifdown LTE1; sleep 5; ifup LTE1.
- Add a cron job: in LuCI System → Scheduled Tasks, add a line like */15 * * * * /usr/bin/your_script.sh.
- Log the actions in /var/log/proxy-rotate.log to track the history of reconnects.
Monitoring and Logs
- Enable 3proxy logging to a separate file. Limit log rotation to avoid filling the flash.
- Use netdata or collectd for monitoring CPU, RAM, interfaces. Install packages carefully, considering memory limitations.
Performance Optimization
- Disable unnecessary services that are not required for the farm to free up RAM.
- Under heavy loads, enable offloading where possible and safe.
- Use short, quality USB cables and ensure that modems are not throttling due to overheating. Add a fan if needed.
External Access and Security
- If you need to connect to the proxy from an external network, set up port forwarding on the external router or check that you have a public IP on WAN.
- Add mandatory authentication in 3proxy and restrict access with an allowed IP list. Operate only within the law.
Tip: For commercial use and rapid scalability, consider ready-made panels and services for managing mobile proxies. For example, MobileProxy.space services help automate routines, but in this guide, you build everything by hand for complete control.
If you want to revisit the installation details of 3proxy, see the 'Step 6: Connecting Proxy Software' section. For questions about choosing modem network access mode, check 'Step 5: raw-IP or Bridge Mode.'
FAQ
- How many modems can be connected to one router? It depends on the strength of the USB subsystem and power supply. Generally, 2-4 modems without issues, 6-8 with a powered hub and adequate power.
- How can I tell which interface belongs to which modem? Connect the modems one at a time and check dmesg, then rename interfaces in LuCI via System → Network Devices where possible. Cable labeling will also help.
- Is raw-IP required? For many QMI — yes. If the connection comes up but traffic doesn’t flow, enable raw-IP.
- How can I ensure that each proxy port always uses the same modem? In 3proxy, specify external wwanX for each block and avoid dynamic reordering of modems across USB ports. Physically fix the modems in place.
- Can I use another proxy server instead of 3proxy? Yes, tinyproxy or mitmproxy. But 3proxy is lightweight and provides convenient external binding.
- How can I automatically change the operator's IP? There are no guarantees; it depends on the carrier. You can restart the interface or modem on a schedule, and sometimes the external IP changes. All actions should be within the agreement with the operator.
- How to check for stability? Ping external nodes, periodical curl requests through each proxy, monitor logs, and receive alerts for unavailability.
- What if there's little flash memory? Remove unnecessary packages, move logs to tmp or external storage, and use minimal OpenWRT builds.
- Can I use IPv6? Yes, if the carrier provides an IPv6 prefix. Set the appropriate protocols in the interface and ensure 3proxy handles IPv6 when necessary.
- Is this suitable for integrating with analytics and data parsing services? Yes, in compliance with legal norms. For example, for your own sites and APIs. With heavy loads, monitor carrier policies and channel speeds.
Tip: Before operational deployment, run a long test: 2-4 hours of continuous requests through each proxy port with logging and subsequent analysis of errors and latency.
Conclusion
You have completed the entire journey: prepared the equipment, installed OpenWRT, configured the mobile modem in QMI/MBIM/NCM mode, enabled raw-IP if needed, deployed 3proxy, and ensured each proxy port routes through its interface. You learned how to check results via curl and logs, dealt with common issues, and discovered how to scale the farm to multiple modems with auto-reconnect, monitoring, and security. Now you can use your proxy farm for legitimate tasks of automation, testing, and integrations, as well as further develop the infrastructure — adding new modems, optimizing routes and failover logic, and setting up schedulers and monitoring.
If you need a unified control panel and ready tools for scaling up, explore commercial solutions and services like MobileProxy.space. But right now, you have a self-assembled working build on OpenWRT with complete control and understanding of every component. Good luck with your operation and expansion!