Quectel Modems for Mobile Proxies: A Step-by-Step Guide from Selection to IP Rotation
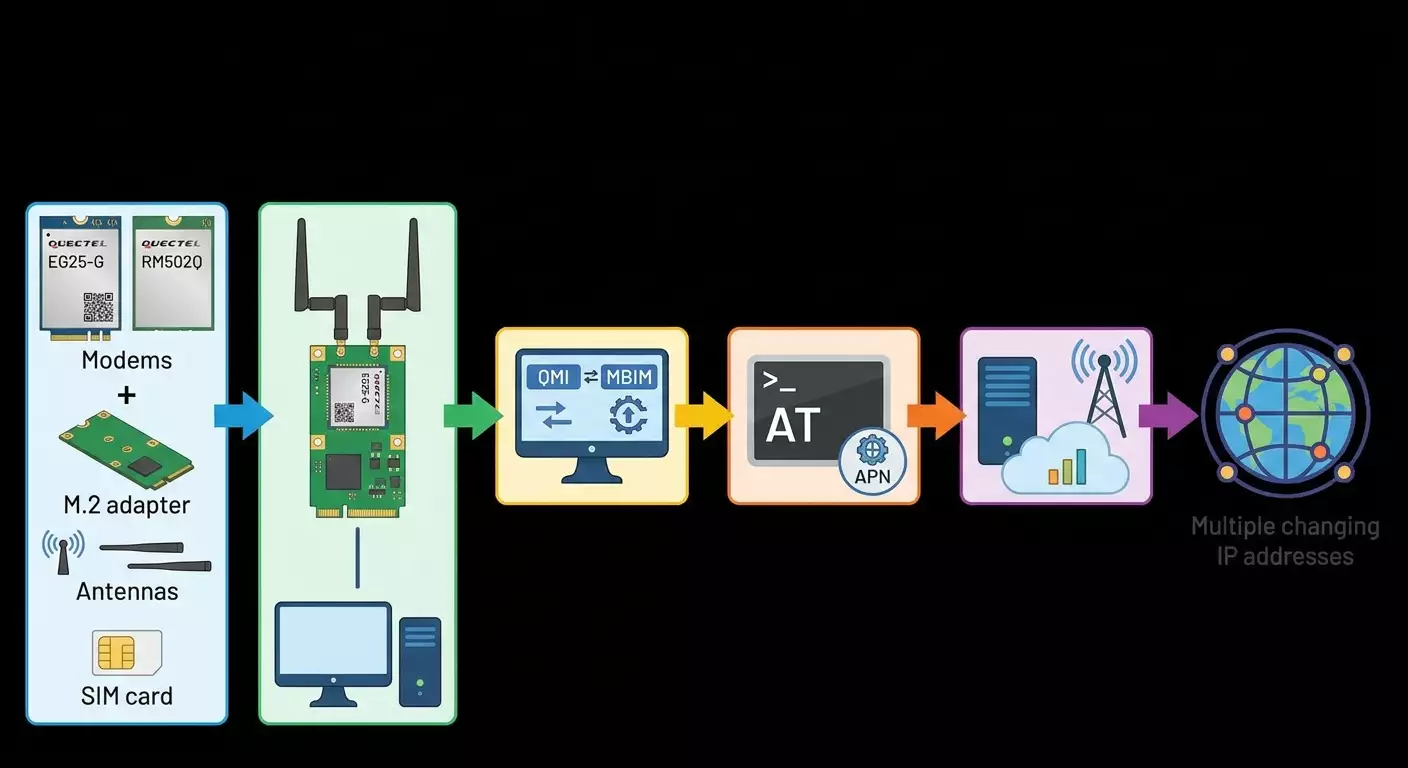
Table of contents
- Introduction
- Preparation
- Basic terms
- What are quectel modules and how do they differ from huawei usb modems?
- Which quectel to choose: eg25-g vs. rm502q (comparison chart)
- What you need for connection: m.2 adapter, antennas, power
- Step 1: selecting and purchasing components
- Step 2: hardware assembly and connection
- Step 3: flashing and configuring the modem for raw-ip (qmi/ecm)
- Step 4: configuring connection: apn, pdp context, qmi/ecm/mbim
- Step 5: basic at commands: changing apn, imei (legal aspect), band-lock and cell reboot
- Step 6: connecting to proxy software and ip rotation
- Testing the result
- Common mistakes and solutions
- Additional capabilities
- Faq
- Conclusion
Introduction
In this step-by-step guide, you'll set up Quectel EG25-G or 5G RM502Q modems for stable mobile proxy operation. You will learn how to choose the right module for your needs, assemble a kit with an M.2 adapter and antennas, flash the modem, configure it for the correct network mode, perform basic AT commands (APN setup, IMEI check, band selection, forced network re-registration), connect the modem to proxy software, and establish reliable IP rotation. This guide is designed for beginners but includes advanced sections for experienced users.
As a result, you will have a fully functional mobile proxy based on Quectel, alongside a clear support and rotation scheme. All steps are equipped with explanations, checks, and solutions for common issues. To speed up your start, the text references the mobileproxy.space service and includes links to useful materials from their blog.
This guide is for you if you: want to switch from Huawei USB modems to more stable Quectel modems; are building a mini-farm for mobile proxies; are implementing mobile proxies for scraping, testing, QA, and advertising while following platform rules and legislation; or are creating a reliable infrastructure with documented support.
No prior knowledge is required. Basic understanding of working with Windows or Linux and familiarity with copying commands will help. Allow one to two working days for full instruction completion: several hours for assembly, flashing, configuration, integration with proxy software, and testing.
Tip: If you're short on time, start with EG25-G on Linux using ModemManager: this is the quickest path to results without dealing with exotic drivers.
Preparation
Before you begin, ensure you have the necessary tools, software, and access. This will eliminate delays and unexpected difficulties during the process.
Required Tools and Components
- One of the modems: Quectel EG25-G (LTE Cat 4) or Quectel RM502Q-AE (5G NR + 4G).
- M.2 adapter with USB 3.0/Type-C for M.2 Key B modules (modem support preferred with a SIM slot and full power supply of 3.3-5V depending on the adapter).
- Antennas: at least 2 LTE antennas for EG25-G and 4 MIMO antennas for RM502Q (NR/LTE), SMA or u.FL with adapters for your setup.
- A SIM card with the correct data plan, active internet service, and known APN.
- A computer: Windows 10/11 or Linux (Ubuntu/Debian Server or Desktop). Linux is recommended for advanced scenarios.
- A power supply/USB port with sufficient current: usually, 1A is enough for EG25-G; for RM502Q, a minimum of 2A is preferable, especially during peaks on the 5G network.
- A quality USB 3.0 cable.
Software and Drivers
- Windows: Quectel drivers (NDIS/MBIM/QMI), Quectel QFlash or QFirehose utilities for flashing, PuTTY for terminal access or QCOM/QNavigator.
- Linux: packages like ModemManager, NetworkManager, libqmi, uqmi, qmicli, mbimcli (depending on the mode); minicom or screen for AT commands.
- Proxy server: 3proxy or similar, or a ready management platform (like the panel from mobileproxy.space).
What to Download and Prepare in Advance
- The latest firmware for your Quectel module (downloadable from the vendor's portal or official supplier).
- Documentation for AT commands for your module (Quectel AT Commands Manual): useful for syntax verification.
- A list of your operator's APN and parameters: PDP type (IP/IPv4v6), whether a username/password is needed (usually no).
Backups and Error Protection
- Windows: set restore points before installing drivers and flashing.
- Save the current version of the modem's firmware (the version can be viewed using an AT command and noted).
- If possible, make a backup dump of NV/QCN through Qualcomm tools (for advanced users). For beginners, it's enough to document the configuration and have the firmware file for rollback.
⚠️ Warning: Any modem flashing comes with the risk of losing functionality during power loss or incorrect versions. Always flash from a reliable source and do not disconnect power until the process completes.
✅ Check: You have the modem, adapter, antennas, SIM, cable, power supply, installed software, and downloaded firmware. You know your APN and have prepared a working OS.
Basic Terms
Before proceeding, let's clarify some key terms in simple language.
- M.2 Quectel Module — this isn’t a USB 'stick' but a professional modem board (like a miniaturized communication computer) that you insert into an adapter for USB connection.
- QMI/MBIM/ECM/RNDIS — methods by which the OS communicates with the modem. QMI and MBIM are modern, 'managed' interfaces; ECM/RNDIS are Ethernet-level network interfaces. For mobile proxies, QMI/MBIM with raw-IP mode is often more convenient.
- raw-IP — a format where the modem’s network stack uses IP without an Ethernet header. Some drivers (qmi_wwan) require raw-IP for correct operation.
- APN — the access point of your carrier. Without the correct APN, the modem won’t connect to the internet.
- AT Commands — textual commands for controlling the modem over the serial port. For example, to change the APN, check signal strength, re-register in the network, etc.
- IP Rotation — reinitializing the connection to receive a new IP from the operator. This can be achieved through a soft re-attach to the network or by rebooting the modem session.
Tip: If you're unsure about choosing between QMI and MBIM, start with ModemManager on Linux; it abstracts the details. On Windows, RNDIS/NDIS for EG25-G and MBIM for RM502Q are often simpler.
What are Quectel Modules and How Do They Differ from Huawei USB Modems?
Huawei USB modems are familiar, but their architecture and drivers are aimed at mass consumer scenarios. Quectel modules are industrial-oriented solutions focused on stability, flexible settings, and prolonged continuous operation. This offers advantages in the context of mobile proxies.
Key Differences
- Form Factor: Quectel is an M.2 board that requires an adapter. Huawei is a ready USB 'stick'.
- Interfaces: Quectel consistently supports QMI/MBIM/ECM, fine-tunes raw-IP, and offers extensive AT commands. Huawei may sometimes require specific modes (HiLink/Stick), firmware flashing, and is less flexible in interface options.
- Reliability: Quectel is designed for implementation in IoT systems/routers. It withstands long uptimes better and shows predictable behavior during reboots.
- Performance: For 5G scenarios, RM502Q significantly outperforms consumer USB solutions.
- Management and Monitoring: Expanded AT commands, network metrics, frequency band blocking and selection, as well as communication debugging provide systematic control without workarounds.
Tip: If you're migrating from Huawei, check out the overview note in the mobileproxy.space blog about Huawei modems to understand the differences in HiLink/Stick mode and interpret analogies correctly. For example, the Huawei modem guide will help you make faster comparisons.
Which Quectel to Choose: EG25-G vs. RM502Q (Comparison Chart)
Below is a visual comparison in the format 'parameter → EG25-G → RM502Q-AE', presented as a list to fit without a table.
- Generation/Category: EG25-G — LTE Cat 4 (up to ~150 Mbps down); RM502Q — 5G NR Sub-6 + LTE (gigabit class under good conditions).
- OS Interfaces: EG25-G — QMI/ECM/RNDIS/MBIM (depends on firmware); RM502Q — MBIM/QMI/ECM, with the main practical choice being MBIM/QMI with raw-IP.
- Antennas: EG25-G — at least 2 LTE; RM502Q — 4 MIMO for 5G/4G and additional GPS if needed.
- Power: EG25-G — relatively modest peaks; RM502Q — demanding, requires stable USB 3.0 with excess current.
- Temperature Stability and Uptime: both have good stability, but RM502Q is more sensitive to heat; consider cooling.
- Price and Availability: EG25-G is cheaper and easier; RM502Q is more expensive but offers 5G and a high speed ceiling.
- Setup Complexity: EG25-G is simpler to start; RM502Q requires more careful assembly (antennas, power, drivers).
- Use Case: EG25-G — budget-friendly stable proxies and LTE farms; RM502Q — high-speed and heavy-use scenarios, 5G coverage.
Tip: If your focus is on stability and scaling with minimal costs, start with EG25-G. If speed and future-proofing with 5G are critical, choose RM502Q and pay attention to power, antennas, and ventilation.
What You Need for Connection: M.2 Adapter, Antennas, Power
At the stage of hardware selection, it's important not to overlook the details: the quality of the adapter and antennas often affects stability.
M.2 Adapter
- Choose an M.2 Key B adapter that supports Quectel modems, USB 3.0, has a SIM slot, and convenient connectors for antennas (SMA/u.FL).
- Ensure it includes brackets/screws for securing the module and u.FL to SMA adapters if your antennas are SMA.
Antennas
- EG25-G: a pair of omnidirectional LTE antennas 3–5 dBi should suffice to start.
- RM502Q: a set of 4 MIMO antennas, where two antennas are better positioned for a direct line of sight with the window; for 5G Sub-6, use antennas supporting the relevant frequencies (e.g., n78). Good gain and matching are critical.
Power and Cables
- USB 3.0 port on the motherboard or an active USB hub with an external power supply.
- A good quality short USB 3.0 cable. Avoid long and 'thin' cables, as voltage drop can cause reboots.
⚠️ Warning: Unstable power is responsible for up to 50% of 'strange' freezes and disconnects. If the modem reboots or disappears from the system under load, first check the power supply and cable.
✅ Check: You have a suitable adapter, antennas, a correct USB cable, and a stable power source, and the SIM is active and properly inserted (trim/adapt to format without damaging contacts).
Step 1: Selecting and Purchasing Components
Goal of the Stage
To form a kit that is guaranteed to work without encountering small issues during assembly.
Step-by-Step Instructions
- Define the tasks: is 5G speed needed? If not, choose EG25-G.
- Select the appropriate M.2 Key B adapter with a SIM holder for the specific modem.
- Choose antennas: 2×LTE for EG25-G or 4×MIMO for RM502Q.
- Check that you have a USB 3.0 port and a sufficiently powerful power supply.
- Prepare a SIM with active internet and a recognizable APN.
- Order a USB 3.0 cable up to 1m long from a reputable brand.
Tip: If you're building a mini-farm, order matching adapters and antennas in bulk. This will simplify maintenance and spare parts management.
Expected Result
You have a complete kit: modem, adapter, antennas, SIM, cable, power supply, PC/server.
Possible Issues and Solutions
- Unclear if the adapter will fit — check the specifications: it should support modems and have reliable power.
- Antennas do not match in connector type — purchase u.FL ↔ SMA adapters.
✅ Check: All components are physically compatible, the power issue is resolved, and the delivery of components is confirmed.
Step 2: Hardware Assembly and Connection
Goal of the Stage
Correctly install the modem in the adapter, connect the antennas and SIM, ensure stable power, and check the modem's visibility by the OS.
Step-by-Step Instructions
- Disconnect the PC from the power source and discharge static electricity (touch a grounded case).
- Insert the Quectel modem into the M.2 adapter slot at the correct angle and secure it with a screw.
- Carefully connect the coaxial antenna cables to the modem ports via u.FL without tilting. Secure the SMA connectors on the adapter.
- Insert the SIM card into the adapter slot. Check the key orientation.
- Connect the adapter to the PC with a USB 3.0 cable. If necessary, connect the external power supply to the adapter/hub.
- Power on the PC. Wait for the system to detect the new device.
- Windows: open “Device Manager” and find the Quectel interfaces (MBIM/QMI/NDIS/modem ports). Linux: run lsusb and dmesg | tail, check for ttyUSBx, cdc-wdm0, wwan0/wwp0s... interfaces.
Tip: Position both LTE antennas at different angles (perpendicular), and for RM502Q, try to spread the 4 antennas in space for better MIMO effect.
Expected Result
The modem is reliably powered, visible in the OS, and has generated the relevant interfaces (serial ports and network interface).
Possible Issues and Solutions
- Modem not visible: check the cable, USB 3.0 port, power, and module fixation in the slot. Try another port or an active hub.
- No network interface: install drivers (Windows) or ensure that the modules qmi_wwan, cdc_mbim, cdc_ether are loaded (Linux).
✅ Check: There is a serial port for the modem in the system (COM in Windows or /dev/ttyUSBx in Linux) and at least one network interface (RNDIS/ECM/MBIM/QMI).
Step 3: Flashing and Configuring the Modem for raw-IP (QMI/ECM)
Goal of the Stage
Update the firmware to a reliable version and configure the network mode that correctly works with your stack (Linux/Windows), ensuring raw-IP, if needed.
Step-by-Step Instructions for Windows
- Install the official Quectel drivers for your module. Restart.
- Run the flashing utility (QFlash for EG25-G or QFirehose for RM502Q). Select the firmware file from the supplier’s kit.
- Put the modem into firmware mode according to the utility's instructions (often just a command from the kit is sufficient; for advanced users, EDL is available, but not required for beginners). Click “Start” and wait for completion.
- After flashing, the modem will reboot. Check the version with a command via the terminal (for example, AT+GMR).
- Configure the network mode. For most scenarios with EG25-G: enable ECM/RNDIS/MBIM as per the module’s documentation. For RM502Q, MBIM is often preferred.
Step-by-Step Instructions for Linux
- Install packages: sudo apt update && sudo apt install -y modemmanager libqmi-utils udhcpc usb-modeswitch.
- Connect the modem and check devices: lsusb, dmesg | tail, ls /dev/cdc-wdm*
- If using QMI: configure raw-IP. Example: sudo ip link set wwan0 down; echo Y | sudo tee /sys/class/net/wwan0/qmi/raw_ip; sudo ip link set wwan0 up; then qmicli -d /dev/cdc-wdm0 --wda-set-data-format=raw-ip
- If using MBIM: ensure the cdc_mbim interface is up; operations can be run through ModemManager/NetworkManager without manual mbimcli commands.
- For Linux, only update the firmware when clear instructions from the supplier are available (often, it’s easier to update on Windows). Beginners are safer working with the current stable version.
⚠️ Warning: Do not interrupt the flashing. Any power loss or software closure could 'brick' the modem. Flash only when necessary: to fix known bugs or add required modes.
Tip: If you're unsure whether a new firmware is critically needed, stick with the current version and only switch the network mode (ECM/QMI/MBIM) — this way you avoid unnecessary risks.
Expected Result
The modem operates with stable firmware. The selected interface (QMI/MBIM/ECM) ensures raw-IP is provided or enabled, if needed by the driver.
Possible Issues and Solutions
- The utility cannot detect the modem: install the correct drivers, switch USB ports, restart the system.
- Devices disappeared after flashing: disconnect and reconnect the modem, check power, rollback the firmware if possible.
✅ Check: In Windows/Device Manager or Linux, you see the corresponding network and control interfaces. The command AT+GMR returns the firmware version.
Step 4: Configuring Connection: APN, PDP Context, QMI/ECM/MBIM
Goal of the Stage
Set the correct APN and PDP parameters, initiate a data session, and ensure internet access.
Step-by-Step Instructions (Universal Logic)
- Connect to the AT console. Windows: use PuTTY to the modem's COM port (baud rate 115200). Linux: sudo screen /dev/ttyUSB2 115200 or minicom.
- Check SIM visibility: AT+CPIN? Expect the response READY. If a PIN is needed, enter AT+CPIN="1234" (your PIN).
- Set the APN. Universal method: AT+CGDCONT=1,"IP","internet" replace internet with your APN. If the operator provides IPv6, you can specify IP or IPV4V6 as needed.
- Select the network scanning mode (if necessary). For example, only LTE: AT+QCFG="nwscanmode",3 for EG25-G. For RM502Q, similar preferences are set via AT+QNWPREFCFG.
- Raise the connection. Linux with ModemManager: mmcli -m 0 --simple-connect="apn=internet" replacing internet with your APN. Windows: if RNDIS/NDIS/MBIM is selected, open network adapters and ensure the interface received an address; with MBIM, the built-in connection manager or supplier tool can be used.
- Check internet accessibility: ping 1.1.1.1 and perform traceroute, also use curl ifconfig.me (or similar command) to check the external IP.
Tip: If your operator has multiple APNs (internet, corporate, with a public IP), check with support for the correct option. An incorrect APN is a common cause of session failure.
Expected Result
The device received an IP from the operator and accesses the internet. You can ping public addresses.
Possible Issues and Solutions
- No network: check antennas, signal level with AT+CSQ, and registration with AT+CEREG? (should be 0,1 or 0,5).
- The session does not establish: check the APN, clear and redefine CGDCONT, reboot the modem with AT+CFUN=1,1.
✅ Check: IP obtained, ping is working, external connection is stable for at least 5-10 minutes without drops.
Step 5: Basic AT Commands: Changing APN, IMEI (Legal Aspect), Band-Lock and Cell Reboot
Goal of the Stage
Master a set of working AT commands for daily operation, diagnostics, and controlling the behavior of the modem in the network.
Changing APN (Universal)
- Disconnect the data session if active (Linux: mmcli -m 0 --simple-disconnect; or AT+CGATT=0).
- Reset the PDP context: AT+CGDCONT=1,"IP","your_APN" Example: AT+CGDCONT=1,"IP","internet"
- Reconnect to the data network (mmcli or via network manager). Check IP.
Checking IMEI and Legal Aspect
Check IMEI: AT+CGSN or AT+GSN. This is safe and useful for inventory management.
⚠️ Warning: Changing IMEI is illegal in most countries, including Russia. This guide does not cover IMEI changing and does not provide any instructions for modification. Always work with the factory IMEI and adhere to legislation and carrier rules.
Choosing Network Modes and Bands (Band-Lock)
This option is useful if you want to exclude undesirable bands with low speed or conversely, lock onto stable bands. Do this consciously and test.
EG25-G (LTE Preference)
- Only LTE: AT+QCFG="nwscanmode",3
- Auto: AT+QCFG="nwscanmode",0
- Selecting LTE bands through AT+QCFG="band" requires caution, as syntax uses bit masks. Example for demonstration: AT+QCFG="band",0,80000A,0 where the second parameter is the LTE mask. Check compatibility for your country/operator in the official AT Reference Quectel to avoid disabling all bands. After changing, reboot the modem with AT+CFUN=1,1.
RM502Q (5G/LTE Preferences)
- Preferred mode: AT+QNWPREFCFG="mode_pref",NR5G:LTE (or LTE:NR5G depending on priority).
- Preferred LTE bands: AT+QNWPREFCFG="lte_band",B3 B7 B20 (example; provide the list of bands without commas or with spaces depending on the firmware version; check syntax in your AT Reference).
- Preferred NR5G bands: AT+QNWPREFCFG="nr5g_band",n78 (example for Sub-6).
Tip: Do not block too many bands at once. Start by enabling the basics, monitor speed and stability metrics, then adjust.
Cell Reboot (Re-registration and Rotation)
- Soft re-registration: AT+CGATT=0 then AT+CGATT=1 — quickly reattaches the PDP. This sometimes grants a new IP.
- 'Radio reinitialization' mode: AT+CFUN=0 then AT+CFUN=1 or a full modem reboot AT+CFUN=1,1. After this, the modem will reattach to the cell.
- Check current cell and parameters: AT+QENG="servingcell" for EG25-G/RM502Q (returns EARFCN/NR-ARFCN, PCI, TAC, RSRP/RSRQ/SINR, etc.).
Tip: For quick IP rotation, AT+CGATT=0/1 is often sufficient without a complete reboot. This saves time and modem resources.
Expected Result
You confidently change the APN, verify IMEI, set band preferences, and know how to safely initiate re-registration for IP rotation.
Possible Issues and Solutions
- After band-lock, the network disappeared: restore auto settings (for EG25-G AT+QCFG="nwscanmode",0 and AT+QCFG="band",0,0,0) and reboot the modem.
- AT commands are not received: check that you're connected to the correct AT port (often ttyUSB2/COMx), and that no active connections block parameter changes.
✅ Check: The commands AT+CSQ, AT+QENG="servingcell", AT+CGDCONT? return expected values; after AT+CGATT=0/1, you see reconnection and possible IP change.
Step 6: Connecting to Proxy Software and IP Rotation
Goal of the Stage
Establish internet access through the modem using a proxy server, set up secure IP rotation, and check authentication and stability.
Option A: Linux + 3proxy (Manual Build)
- Install 3proxy: sudo apt update && sudo apt install -y build-essential && download and build 3proxy according to the instructions from the repository (without external links — use your distro’s package manager if available).
- Create a 3proxy configuration with authentication via username/password and binding to the modem interface. Example (pseudoconfiguration): setgid 65535; setuid 65535; auth strong; users user:CL:pass; allow user; proxy -a -p3128 -i0.0.0.0 -eIP_OF_MODEM_INTERFACE replace port and parameters as needed. In a real configuration, use the correct external interface directive (-e) or iptables for the source interface.
- Run 3proxy as a service. Check that the port is listening: sudo ss -lntp | grep 3128
- Set up a rotation script. A simple way: a script with AT commands or mmcli that runs AT+CGATT=0/1 or AT+CFUN=1,1. Example (mmcli): mmcli -m 0 --disable; sleep 5; mmcli -m 0 --enable; sleep 10; mmcli -m 0 --simple-connect="apn=internet". Wrap in a systemd service + timer or cron with the desired interval.
- Check that the external IP changes after rotation (curl ifconfig.me before and after).
Tip: Enable logging for 3proxy and store rotations in a log with timestamps. This helps track when the IP changed and any connection errors.
Option B: Management Panel and Service
If you don’t want to set everything up manually, consider using a ready-made solution. The mobileproxy.space service offers convenient tools for managing mobile proxies, including rotation automation, monitoring, and billing. This reduces setup time and simplifies support. Explore their materials on building a farm, such as the article “How to Build a Mobile Proxy Farm on Linux” in their blog: farm guide.
Expected Result
The proxy server is listening on the specified port, the connection passes with authentication, traffic flows through the modem, and IP rotation works on a schedule or at the press of a button.
Possible Issues and Solutions
- Proxy not listening on the port: check the configuration, permissions, firewall.
- IP doesn’t change during rotation: switch the rotation method to AT+CFUN=1,1 or increase the pauses between operations, ensure the operator is indeed issuing a new address.
- Session drops under load: check power and antennas, reduce the rotation interval.
✅ Check: The client successfully connects to the proxy, IP is recognized as mobile in the network, and changes after rotation according to the chosen mechanism.
Testing the Result
Checklist “Should Work”
- The modem is reliably visible in the OS; interfaces don’t disappear under load.
- The APN is set correctly; the data session connects without errors.
- Pings are stable; packet loss is minimal or absent.
- The proxy server is running, authentication works, and traffic is flowing through the modem.
- IP rotation is completed correctly and logged.
How to Test
- Stability for 30–60 minutes under ping and load (speedtest), without interface drops.
- Repeat rotation multiple times to ensure IP changes and reconnections occur.
- Check that all services start automatically after server reboot (modem attach, proxy, rotation).
Success Indicators
- Modem/proxy uptime without failures exceeding 24 hours.
- Rotation without error >95% of attempts.
- Average RSRP/RSRQ/SINR in the green zone for your location (for example, RSRP better than -100 dBm, SINR above 5–10 dB).
✅ Check: If all checklist items are green, your mobile proxy on Quectel is ready for operation.
Common Mistakes and Solutions
- Problem: Modem periodically disappears from the system. Cause: Unstable power or poor cable. Solution: Replace the cable with a short USB 3.0, use an active hub/power supply with excess capacity, ensure cooling.
- Problem: No internet when the interface is 'up'. Cause: Incorrect APN or PDP profile. Solution: Reset and redefine AT+CGDCONT; restart the session, check registration AT+CEREG?, signal level AT+CSQ.
- Problem: Unstable and low speeds. Cause: Unsuitable bands, poor antennas, heavy cell load. Solution: Optimize antenna placement, try band-lock on stable bands, test at different times.
- Problem: IP rotation does not change the address. Cause: The operator retains the IP for the session/SIM card. Solution: Increase the pause, use AT+CFUN=1,1, re-register on a different cell, ask the operator about tariff features.
- Problem: Cannot connect to the required port via AT. Cause: Connected to the wrong tty/COM. Solution: Cycle through the ports based on dmesg in Linux and the ‘Device Manager’ in Windows.
- Problem: After a band-lock attempt, the network is completely lost. Cause: Critical bands disabled. Solution: Restore auto settings (AT+QCFG="band",0,0,0; AT+QCFG="nwscanmode",0) and reboot the modem AT+CFUN=1,1.
- Problem: On RM502Q, 5G doesn't connect even with coverage. Cause: Incorrect mode_pref preferences or insufficient/inappropriate antennas. Solution: Adjust AT+QNWPREFCFG="mode_pref",NR5G:LTE and correct nr5g_band; replace antennas with 5G Sub-6 compatible ones and ensure visibility of the base station.
Tip: Maintain a changelog. Record the date, command, and result. This speeds up rollbacks and prevents repeat mistakes.
Additional Capabilities
Advanced Settings
- Dual connectivity (EN-DC) on RM502Q: balance LTE/NR preferences for optimal latency and stability.
- Monitoring scripts: periodic AT+QENG="servingcell" queries for logging network parameters and automated band switching during degradation.
- Load balancing: multiple modems with independent proxy ports and routing based on policy-based rules (ip rule, iptables).
Optimization
- Hardware: Use a metal casing/heatsink for RM502Q to avoid throttling under heavy network usage.
- Network: On Linux, use systemd units to automatically bring up sessions after reboot, including 3proxy dependencies on network 'online' events.
- Logs: Centralized storage of rotation and speed logs (e.g., journald + simple parsers) for long-term analysis.
Tip: If you manage multiple dozens of modems, explore mobileproxy.space's materials on farm approaches. This speeds up process standardization and automation.
FAQ
- How many modems can be connected to one server? It depends on USB controllers and power. Practical experience shows 4–8 modems per node with active hubs and separate power lines.
- Is a static public IP needed? No, mobile proxies usually use the operator's dynamic IPs. A static public IP is not required for proxy tasks.
- How quickly can rotation be done? Start with intervals of 5-15 minutes. Excessive rotation frequency can degrade stability and cause latencies.
- Can Windows be used instead of Linux? Yes. For EG25-G — RNDIS/NDIS; for RM502Q — MBIM. Check drivers and ensure proxy software autostarts.
- Do I need to tune TCP? Usually no. But for high speeds on 5G, tuning buffers and offload parameters for the network card on Linux can help.
- How to select antennas? Choose antennas supporting the required frequencies, with adequate gain and good cables. For RM502Q — a set of 4 MIMO antennas.
- What to do if the signal is weak? Place antennas by the window, extend to the outdoors via cable, use directional antennas, or elevate the installation height.
- How to know if the driver mode is correctly selected? The interface receives IP without errors, pings are stable, qmicli/mbimcli/ModemManager do not report critical errors, and speed meets expectations.
- Can eSIM be used? Depends on the specific module version and adapter. For most scenarios, a regular SIM is easier.
- How to document the configuration properly? In a README file on the server, keep track of the modem model, firmware version, APN, rotation method, proxy ports, and change dates.
Conclusion
You have successfully navigated the full process: chosen a Quectel module (EG25-G or RM502Q), assembled the hardware kit, updated the firmware when necessary, set the modem to the proper operating mode (QMI/ECM/MBIM) with raw-IP when required, configured the APN and PDP context, mastered basic AT commands for daily control and rotation, connected the modem to proxy software, and checked stability. Now you have a solid foundation for mobile proxies.
What to do next: automate rotation and monitoring, add new modems, build a compact “farm” and standardize configurations. If you want to expedite deployment and support, consider the mobileproxy.space ecosystem and their materials on building farms and working with hardware.
Where to develop: transition from EG25-G to RM502Q as 5G tasks arise, improve your antenna system, test different APNs and bands, implement intelligence rotation logic, utilize centralized monitoring of network metrics and alerts. This way, you transform a standalone proxy into a managed, scalable infrastructure.
Tip: Regularly update your internal documentation: firmware version, command and script lists, configuration templates. This will save hours during scaling and support.