Shopify and Dropshipping: How to Launch a Multi-Store Using Mobile Proxies - Step-by-Step Guide
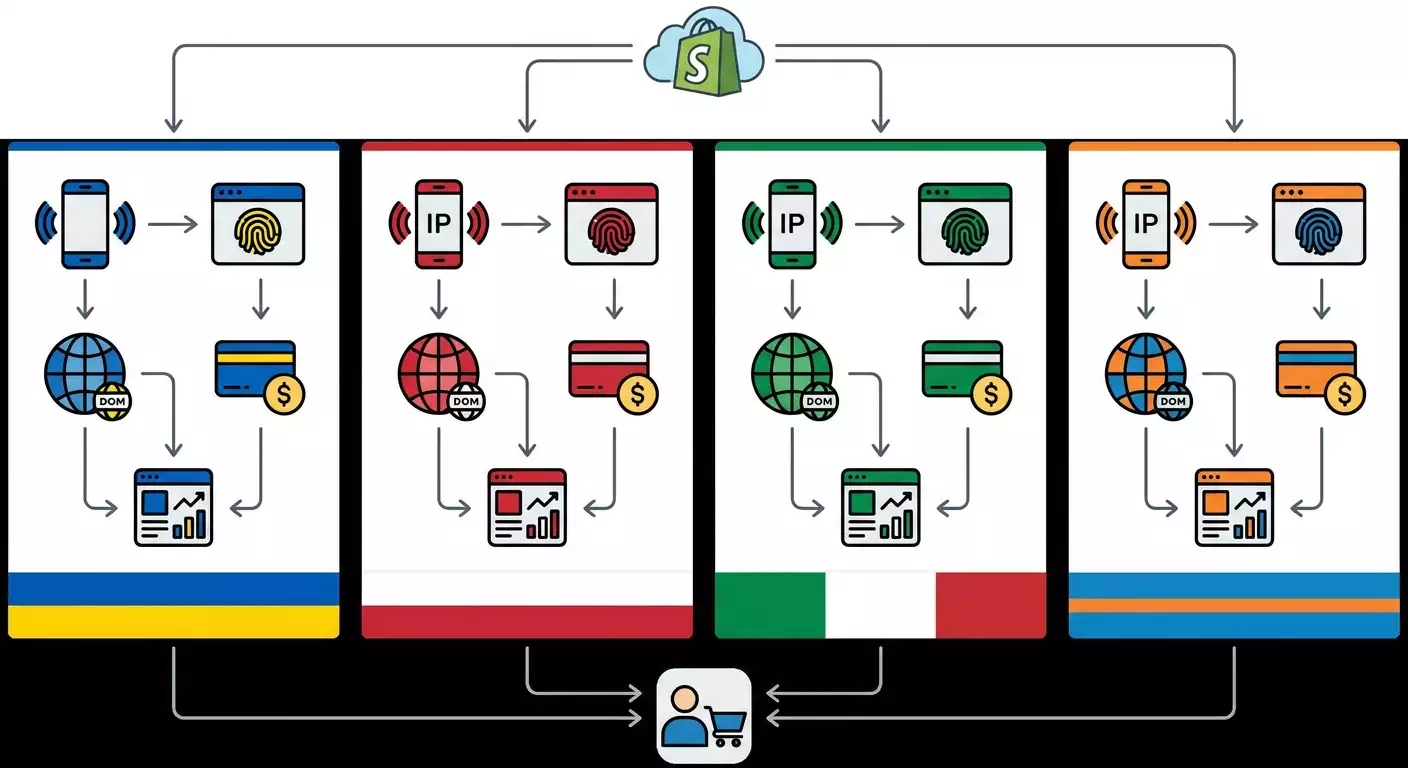
Table of contents
- Introduction
- Preliminary preparation
- Basic concepts
- Step 1: why shopify blocks related stores
- Step 2: isolation: one store equals one mobile ip plus profile
- Step 3: geolocation of ip to the store’s country and payments
- Step 4: managing ad accounts
- Step 5: creating and initial configuration of each shopify store
- Step 6: payments and financial isolation
- Step 7: content, catalog, and policy compliance
- Step 8: operational processes without overlaps
- Step 9: monitoring, logging, and ip change procedures
- Launch checklist without blocks and result verification
- Common mistakes and solutions
- Additional opportunities
- Faq
- Conclusion
Introduction
In this step-by-step guide, you'll learn how to create and set up a multi-store in Shopify for dropshipping with secure isolation through mobile proxies. We’ll discuss why Shopify blocks related stores, how to establish the principle of "one store = one mobile IP + one profile", how to properly assign an IP to the store's country and payments, how to manage ad accounts, and how to compile a launch checklist without blocks. We'll go from zero to results: from preparing tools and creating your first isolated pair to testing and quality control. The approach is focused on compliant use of platforms and maintaining a high level of trust from payment providers and ad networks.
By the end of this guide, you'll have a working set of Shopify stores, each isolated on its own mobile IP, with its browser profile, domain, corporate email, payment provider, and ad account. You’ll receive action templates, straightforward checks, and a list of common mistakes to quickly address issues.
This guide is suitable for both beginners and advanced users. Newbies will be able to launch their first multi-store using the ready-made scheme, while more advanced readers will find useful details on isolation, logging, payments, ad account structures, and automation.
Before you start, it’s useful to understand the basics of Shopify, dropshipping, and mobile proxies. If you are just getting acquainted with the model, study the internal material "Dropshipping: From Niche to Launch". It will provide context on product strategy, suppliers, logistics, and customer support. In this guide, we will focus on infrastructure, security, and verifiable setup steps.
How much time will it take: You can set up the basic infrastructure in one day if you have already purchased domains and proxies. The full cycle, including connecting payments and verifying ad accounts, usually takes between 2 to 7 days depending on the country of registration for the stores and the processing time from payment providers and ad networks.
Preliminary Preparation
Before starting, gather tools and access, check minimal technical requirements, and prepare a place to store documents and backups. This will save you hours and reduce the chances of mistakes at critical steps.
Necessary Tools and Access
- A Shopify account with the ability to create stores and subscribe to plans (a separate subscription for each store).
- Domain names for each store (one domain per brand, e.g., brandname-shop.com).
- Corporate email for each brand (e.g., support@brandname-shop.com), ideally in the same mail service with separate mailboxes on the domain.
- Mobile proxies with manual or automatic rotation, country selection, and robust mobile ASN. As a service example, consider mobileproxy.space. A strong point of mobile proxies is the natural distribution of users behind a single IP in mobile networks (CGNAT), which enhances trust from many platforms.
- A multi-profile browser (anti-detect browser) for isolating fingerprints and cookies for each store, e.g., any reliable product with profiles, unique User-Agent, and separate cookie containers.
- A password manager (e.g., local or corporate) for securely storing access information.
- A 2FA (two-factor authentication) app on your phone.
- Payment providers: accounts with those available for your country (e.g., Shopify Payments, Stripe, PayPal Business, regional providers). The set depends on the store's country.
- Advertising platforms: business accounts in Meta Ads, Google Ads, TikTok Ads, and others as necessary.
System Requirements
- A modern computer (Windows, macOS, or Linux) with 8GB RAM or more.
- An updated browser for the admin panel (Chromium-based or Firefox) and a separate multi-profile browser for the store's and ad accounts' working profiles.
- A stable wired or high-quality Wi-Fi connection to the Internet. Important: a stable channel for video support and passing verifications.
What to Install and Configure
- Install the multi-profile browser. Create an empty workspace.
- Install the password manager. Create storage: "Shopify", "Domain", "Payments", "Advertising".
- Prepare an accounting table: columns “Brand”, “Store URL”, “Domain”, “Email”, “Mobile Proxy”, “Browser Profile”, “Country”, “Time Zone”, “Payment Provider”, “Ad Accounts”, “Notes”.
- Confirm domain ownership in the registrar's panel. Turn on auto-renewal.
- Enable 2FA on email accounts and in services with access to payments.
- Create a backup directory in cloud storage for documents: company charter documents, statements, legal materials, brand kits, policy templates.
Backups
- Export contacts and passwords from the password manager to an encrypted file and store it offline as a backup.
- Duplicate the accounting table in a separate "read-only" file to track history.
- Keep legal documents and verification statuses in folders by each brand.
✅ Check: You have domains, email accounts, access to mobile proxies, a multi-profile browser is installed, and the accounting table is created. 2FA is enabled on all critical services. A backup directory is ready.
Basic Concepts
Before moving on to the steps, let’s go over key terms and principles. This will help you approach each action with awareness and avoid non-obvious traps.
- Shopify Store - a separate instance of a storefront with its own URL, payment settings, policies, and admin accesses.
- Browser Profile - an isolated environment with unique cookies, cache, User-Agent, font list, and other parameters forming a “fingerprint”.
- Browser Fingerprint - a set of technical characteristics of your environment (time zone, language, plugins, WebGL state, window size, etc.) by which platforms increase identification accuracy.
- Mobile Proxy - a proxy operating through cellular networks. Behind a single public IP usually stands a multitude of subscribers (CGNAT). This makes a mobile IP natural and often increases trust in the session compared to many data center IPs.
- IP Rotation - the change of the mobile proxy address on a schedule, via API, or manually. It’s important to maintain a reasonable frequency to avoid appearing suspicious.
- ASN/Operator - an autonomous system and mobile network provider that “issues” IPs. Some platforms are skeptical of unknown or frequently abused ASNs.
- Geolocation - the coordination of the country and city of the IP, time, currency, payment provider, legal address, and locale of the store and ad interfaces.
- Connections Between Stores - indicators by which platforms may determine that stores are affiliated: a common payment instrument, the same account manager, repeating IPs, matching image files, identical policy texts, common analytics, the same second-level domain, a single CRM without distinctions, etc.
Tip: Document all decisions regarding isolation and geolocation in the table. Document the “why” and “how”. This will help scale the multi-store and train your team without losing quality.
Step 1: Why Shopify Blocks Related Stores
Goal of the Stage
Understand the platform's logic and formulate rules to avoid creating risks of blocking. After this stage, you will have a list of “red flags” and an isolation policy for your stores.
Step-by-Step Instructions
- Open the Shopify Terms of Service and Acceptable Use Policy in the admin panel or help section. Find the sections regarding multi-brand operations and payments.
- Create a list of “connection signs” that might potentially unify stores: the same domain, identical content, common payment cards, identical IPs and browser profiles, matching support contacts, identical legal identifiers, identical analytics pixels.
- Divide the signs into categories: technical (IP, fingerprint), content (texts, images), payment (one provider/same details), organizational (same administrators, emails, phone numbers).
- Determine permissible overlaps. For example, one legal company-owner can own several brands, but each brand must have its own domains, emails, policies, payment configurations, and isolated work sessions.
- Create a document titled “Multi-Store Isolation Policy”. Fix the rule “one store = one mobile IP + one profile,” separate domains and emails, separate payments and advertising.
- Review the document with your team. Each member must adhere to it to avoid compromising other stores.
⚠️ Attention: Never use the same payment instrument (the same card or merchant account) for different brands without explicit support for this model from the payment provider. This is a common reason for holds and audits.
Tip: Create a visual checklist of store distinctions: logo, color palette, legal address in the footer, different shipping and return policies. This disciplines content uniqueness.
✅ Check: You have a list of connection signs and the document “Multi-Store Isolation Policy.” The accounting table has been updated with columns to track isolation.
Possible Problems and Solutions
- Problem: Difficulty determining what specifically raises suspicions. Cause: Lack of an overall picture of signals. Solution: Conduct weekly audits of store isolation based on your checklist.
- Problem: The team forgets about the rules. Cause: Lack of visual reminders. Solution: Print a condensed version of the policy and display it prominently in the office, duplicate it in your task manager.
Step 2: Isolation: One Store Equals One Mobile IP Plus Profile
Goal of the Stage
Set up technical isolation: each store = its mobile proxy, its browser profile, and its working environment. After this stage, each store is opened only in its profile and through a fixed mobile IP.
Step-by-Step Instructions
- Select a reputable mobile proxy provider that supports the countries where you plan to operate stores. You may consider mobileproxy.space. Pay attention to session stability, manual and API rotation, and uptime statistics.
- Define the architecture: either by modem/channel per store or by a dedicated slot in the proxy pool per store. For predictability, it’s better to have one modem/port per store with manual rotation as needed.
- Create a profile in the multi-profile browser named “Brand A — Shopify.” Set the country, language, and time zone to match the future store.
- Connect the mobile proxy to the profile. Specify the protocol (HTTP(S) or SOCKS5), hostname, port, username, and password. Save.
- Launch the profile. Go to an IP and fingerprint testing site. Check the country of the IP, network type (Mobile/Cellular), and browser fingerprint (within reasonable limits without extreme spoofing).
- Block “automatic fingerprint updates” in the profile (if available) to avoid abruptly changing parameters during verifications.
- Create a separate profile called “Brand A — Ads” for the ads accounts of that brand. Connect the same mobile proxy and identical locales to it.
- Repeat for “Brand B,” “Brand C,” etc. Never use the same profile for different brands.
- Establish a rule: “Open the store only in its profile and only through the assigned mobile IP.” Fix this in your checklist.
⚠️ Attention: Excessively frequent rotation of mobile IP at the early stages of setup appears suspicious. For stability, do not change the IP during the store registration process and verifications unless there's a compelling reason.
Tip: Make profile names uniform: “Brand — Geo — Medium (Shopify/Ads).” This speeds up navigation and reduces the risk of confusing profiles.
✅ Check: In the “Brand A — Shopify” profile, the IP test shows the correct country and mobile network. The “Brand A — Ads” profile opens with the same IP and locales. The accounting table lists the “profile-proxy” pair for each brand.
Possible Problems and Solutions
- Problem: IP is identified as a data center IP. Cause: an inappropriate pool was selected. Solution: Request a mobile pool with a confirmed ASN from the mobile operator from your provider.
- Problem: Connection drops. Cause: weak signal from the modem or port overload. Solution: Move the modem, change the port, or reduce the number of simultaneous tasks on that slot.
- Problem: Extension conflicts. Cause: too many plugins in the profile. Solution: Minimize add-ons to the essentials (password manager, 2FA if necessary).
Step 3: Geolocation of IP to the Store’s Country and Payments
Goal of the Stage
Synchronize the country of IP, legal address of the store, currency, payment provider, time zone, language, and contact details. After this stage, your store looks and operates as local for the selected country.
Step-by-Step Instructions
- Determine the store's country considering assortment, logistics, and available payment providers. Record it in the table.
- In the profile “Brand A — Shopify,” create a store in Shopify. Specify the business country, address, postal code, and working phone format for that country. Use real and verifiable data.
- Set the storefront language and admin panel language to match the country. Choose the default currency accepted in that country.
- Set the time zone of the city indicated by your IP. This reduces discrepancies in platform logs.
- Connect a domain with local branding. In the “Domains” section, add the domain brandname-shop.com. Write records in the registrar's panel and wait for the status “Connected.”
- Create a corporate email at the same domain. Indicate it as the contact email for the store and support settings in Shopify.
- Select a payment provider available for the country. For example, Shopify Payments in countries where it is supported or a local provider. Complete basic verification and confirm the details.
- Check that the IP in the profile belongs to the same country. If not, switch the mobile proxy slot to the required country at the provider and restart the profile.
- Update full details in “Settings → Store details” and “Payments.” Ensure that the address for payments and the store address coincide by country and format.
Tip: Keep templates of localized delivery, return, and privacy policies for each target country. This speeds up launches and reduces the risk of issues from payment systems.
✅ Check: The store specifies the country, currency, language, and time zone corresponding to the IP. The domain is connected, corporate email is working, and the payment provider is configured for the store's country.
Possible Problems and Solutions
- Problem: The payment provider requests additional documents. Cause: Risk profile of the industry or country. Solution: Prepare foundational documents, bank statements, proof of address, and supplier agreements in advance.
- Problem: IP occasionally shifts to a neighboring country. Cause: peculiarities in the distribution of mobile IPs. Solution: Agree with the provider to fix the pool to your specific country or use a slot with geo-fixing.
Step 4: Managing Ad Accounts
Goal of the Stage
Set up separate ad accounts for each brand, aligned in terms of geo, billing, and access, and link them to the store without overlaps that increase the risk of blocking.
Step-by-Step Instructions
- Launch the profile “Brand A — Ads” with the same mobile IP and locales. This is your working profile for the brand's advertising platforms.
- Create a business account in your chosen advertising platform (e.g., Meta Business or Google Ads). Specify the location and currency corresponding to the store.
- Connect a payment method that does not overlap with other brands. It’s better to use a separate corporate card or account for each brand.
- In Shopify, connect the relevant integration (e.g., Meta or Google) through the app marketplace. Work only from the “Brand A — Ads” profile, and then confirm the connection in the store's admin panel.
- Create an analytics pixel/tag and link the domain. Complete domain verification on the advertising platform's side.
- Set user roles. Add only necessary employees. Avoid using the same employee personal accounts across all brands.
- Verify that the time zone and currency of the ad account match those of the store. This is vital for correct attribution and log consistency.
- Repeat the process for all advertising platforms. Keep accesses and parameters in the accounting table and password manager.
Tip: Establish a rule: the domain is verified and attached to a single business account. Do not share one domain across multiple brands even for testing purposes.
✅ Check: For “Brand A”, ad accounts have been created and are functioning with a unique payment method, the domain is verified, and the pixel is installed and sees events from the store.
Possible Problems and Solutions
- Problem: Ad decline due to policy non-compliance. Cause: content or return policies. Solution: Adjust texts, follow platform rules, and synchronize policies in Shopify and advertising platforms.
- Problem: Require re-verification. Cause: Overlapping employee accesses. Solution: Separate roles, establish different working emails for different brands.
Step 5: Creating and Initial Configuration of Each Shopify Store
Goal of the Stage
Assemble a shop framework with unique branding, structures, and policies while avoiding overlaps with other brands.
Step-by-Step Instructions
- In the profile “Brand A — Shopify,” go to the admin panel and choose a theme. Configure colors and fonts that differ from your other brands.
- Upload the logo and favicon. Ensure they are unique. Keep the source files in the brand's folder.
- Create the pages “About Us,” “Shipping,” “Returns,” “Privacy Policy,” “Contact.” Use localized templates and real contact details.
- Set up the menu and footer. Add links to key policies and the contact page.
- Configure tax parameters in “Taxes and duties” according to the country. Use official tax guidelines for your jurisdiction.
- Connect the domain if you haven’t done so earlier. Enable SSL. Check that the domain displays as the primary one.
- Set the email sending of notifications from the corporate address. Complete domain verification with your email provider (SPF, DKIM).
- Install applications necessary for logistics and analytics. Try to avoid applications that require excessive permissions if you can do without them.
Tip: Keep policy templates and page placeholders in versions for each country. This speeds up the deployment of new stores without the need to copy-paste the same text.
✅ Check: The store displays unique branding, the domain is active, policy pages are created, taxes and email are configured. There are no links or artifacts indicating other brands.
Possible Problems and Solutions
- Problem: Emails go to spam. Cause: No SPF/DKIM. Solution: Set up records with your email provider and re-verify the domain.
- Problem: The theme looks the same as another brand's. Cause: You copied settings. Solution: Change the palette, spacing, blocks. Achieve sustainable differences.
Step 6: Payments and Financial Isolation
Goal of the Stage
Ensure a separate financial infrastructure for each brand: providers, accounts, documents, and return processes.
Step-by-Step Instructions
- In “Payments,” add payment providers available in the store's country. Ensure the currencies match the store and advertising platform settings.
- Complete the KYC/AML procedures of the provider. Prepare documents: charter, address, and bank documents. Upload them through the provider's personal account.
- Create separate accounts in payment systems for each brand (if allowed). Indicate the unique legal names of the brand or trade names if available.
- Set transaction notification emails to the brand's corporate email, not a general company inbox.
- Write processes for returns, chargebacks, and customer requests. Create a template response for customer support for each brand.
- In a separate tab, create a payment registry: “Date”, “Provider”, “Amount”, “Currency”, “Status”, “Comment”.
Tip: If multiple currencies are supported, test payment scenarios with small amounts from various customer payment methods. This identifies problems before launching advertising campaigns.
✅ Check: Providers are connected and verified, a test payment goes through, emails arrive at the brand's corporate inbox. A payment registry is maintained in the table.
Possible Problems and Solutions
- Problem: Holds and delayed payouts. Cause: new account or risk category. Solution: Start ad expenditures cautiously, maintain high customer satisfaction, and provide timely support responses.
- Problem: Integration rejection. Cause: mismatch of legal details. Solution: Synchronize addresses and names across all sections, providing additional confirmations when needed.
Step 7: Content, Catalog, and Policy Compliance
Goal of the Stage
Form the assortment, product cards, and content in line with Shopify's rules, payment providers’, and advertising platforms’, without repetitions between brands.
Step-by-Step Instructions
- Gather the brand's catalog. Avoid identical SKUs and descriptions across different stores. Each brand should have its own matrix.
- Create product cards with localized titles and descriptions. Use unique photos or lawful images from suppliers.
- Check categories for advertising and payment restrictions. Exclude high-risk products or prepare additional confirmations.
- Set prices and taxes according to the target country. Check rounding accuracy and currency symbols.
- Align policy pages with the assortment. For example, for electronics - clarify the warranty; for fashion - return conditions by size.
- Conduct a test purchase for a small amount. Evaluate the order processing speed and the correctness of customer emails.
Tip: Create unique bundles and discount sets for each brand. This not only helps to visually differentiate stores but also offers commercial proposals.
✅ Check: The catalog is created, product cards are unique, the test purchase is successfully completed, and emails and order statuses are correct and localized.
Possible Problems and Solutions
- Problem: Duplicate images between brands. Cause: common source. Solution: Change backgrounds, angles, create your own mockups, and update file metadata.
- Problem: Ad cards rejected. Cause: policy violations. Solution: Clarify categories, avoid promises beyond reasonable results, add certification if required.
Step 8: Operational Processes Without Overlaps
Goal of the Stage
Disperse support channels, logistics, CRM, and analytics by brands to avoid creating technical and organizational ties between stores.
Step-by-Step Instructions
- Create separate email inboxes for each brand: support@, orders@, returns@ on your domain. Set up filters and labels.
- Diversify support phone numbers by brand. Use numbers in the country of the store or a quality telephony service with local numbers.
- Select a CRM with multi-tenancy support or set up separate installations for the brands. Do not mix customer databases.
- Set up separate warehouse locations and stocks with suppliers (if applicable). Document SLAs for order and return processing.
- Connect analytics (e.g., tags and pixels) strictly by brands. Avoid situations where the same analytics resource collects data from multiple stores at once.
- Define brand responsibilities. Each should have its own set of accesses, without cross-logins to others' accounts.
Tip: Conduct a “demarcation” every two weeks: check roles, accesses, emails, auto-responders to timely eliminate overlaps.
✅ Check: Support services, phones, CRM, and analytics operate separately for each brand. There is no mixing of data in reports between stores.
Possible Problems and Solutions
- Problem: An accidental email from a customer directed to another brand. Cause: shared helpdesk. Solution: Set up routing rules and unique queue addresses.
- Problem: Shared analytics resources. Cause: convenience of setup. Solution: Separate projects, remove unnecessary integrations, and update SDK keys.
Step 9: Monitoring, Logging, and IP Change Procedures
Goal of the Stage
Establish an order for monitoring the infrastructure and safely changing IPs to eliminate unexpected triggers and quickly respond to risk signals.
Step-by-Step Instructions
- Add columns “Last IP Change”, “Reason for Change”, “Result” to your accounting table. Document all operations.
- Agree on procedures: change the IP only when there is a real need (suspicion of leaks, explicit failures), and not more frequently than a certain norm (e.g., no more than once every 7-14 days during early stages).
- Set up domain availability monitoring and response time for the store. Use external monitoring services, email notifications to the brand.
- Maintain an access log: who, when, and from which profile accessed the store and ad accounts. Use platform event logs and internal logging.
- Once a week, check for consistency: IP country, time zone, locales, currencies, return policy, footer content.
- When changing the IP, if necessary, close active sessions and operations in the ad accounts in advance to not interrupt work at critical steps.
Tip: Keep a backup mobile slot with the same geo. If the main IP is unstable, switch to the backup as per the procedure and document the reason.
✅ Check: There is an IP change procedure and a logging journal. Domain monitoring and availability checks are working; discovered incidents are documented and resolved.
Possible Problems and Solutions
- Problem: A sharp increase in payment errors. Cause: network delays or captcha on the payment page. Solution: Check uptime and latency; if necessary, switch to backup slots, optimize widget scripts.
- Problem: Frequent forced re-authentication in ad accounts. Cause: unstable sessions. Solution: Reduce the frequency of IP rotation; clarify TTL with the proxy provider.
Launch Checklist Without Blocks and Result Verification
Checklist: What Should Work
- Each store is opened only from its profile, only through its mobile IP.
- The country of the IP matches the country of the store, payments, currency, language, and time zone.
- Each brand has a unique domain and corporate email verified via SPF/DKIM.
- Payment provider is connected and verified; test payments go through successfully.
- Ad accounts are created, the domain is verified in each, and pixels see events.
- The catalog and content are unique; policies comply with products and the country.
- Operational services (CRM, telephony, helpdesk, analytics) are separated by brands.
- Monitoring, IP change regulations, and access logs are set up.
How to Test
- Access Brand A's store from an alternate profile. Ensure you aren’t doing this. If you happen to enter accidentally, document the incident and close the session.
- Check the country of the IP and time on the verification site in each profile.
- Conduct a test purchase in Brand A. Check emails, statuses, integrations, and analytical events.
- Run a test campaign with a small budget in one ad account. Ensure that event attribution is correct.
- Check payment dashboards and advertising for errors.
Key Performance Indicators for Successful Execution
- Zero intersection of IPs and profiles between brands.
- Consistency of geo-parameters: country, time zone, currency, locale.
- Successful completion of test purchases without errors and delays.
- Approval of test ads and correct domain verification.
Tip: Save screenshots of key checks (IP country, successful payment, analytics events) in the brand’s folder. This expedites dialogue with marketplace support on issues.
Common Mistakes and Solutions
- Problem: Multiple stores were opened in the same profile. Cause: haste, unclear rules. Solution: introduce a prohibition on cross-openings, set roles in the multi-browser, verify logs, and reissue cookies for profiles if necessary.
- Problem: The same support number in the footer of two stores. Cause: template copying. Solution: Obtain separate numbers, update the footer, and add checks to the content checklist.
- Problem: The same payment method across different brands. Cause: time-saving. Solution: Separate payment profiles and cards, conduct a new verification, and adjust billing in the ad accounts.
- Problem: Advertising declined due to the domain. Cause: The domain was not verified in the business account. Solution: Complete domain verification and tie it to a single business account.
- Problem: Frequent requests for re-log in Shopify. Cause: Unstable proxy or frequent IP changes. Solution: Stabilize the session, reduce the rotation, test another slot.
- Problem: Emails to customers are not being received. Cause: SPF/DKIM not set. Solution: Verify the domain with the email provider, check the error logs in Shopify.
- Problem: The same analytics pixel in two stores. Cause: convenience of copying. Solution: Create unique pixels, update integrations, and delete old tracking keys.
Additional Opportunities
Advanced Settings
- Fixing the mobile IP: agree with the provider on a stable pool for the required geo. This reduces random discrepancies by country.
- Separate tag containers: use distinct containers for each brand to manage events and retargeting more accurately.
- Accounting automation: add forms to your table so that employees can only open new stores after filling out all isolation parameters.
Optimization
- Load testing: check storefront speed under advertising traffic. Optimize images, reduce third-party scripts.
- Quality of payment trust: build a positive transaction history, maintain a high response rate in support, and decrease return ratios.
- Session stability: minimal IP rotation, stable locations, consistent login and operation templates.
What Else Can Be Done
- Team training: regularly conduct mini-training sessions on isolation policy and geolocation.
- Branding audit: refresh storefront designs quarterly to visually maintain distance between stores.
- Documentation: supplement internal material on dropshipping and infrastructure. Reference sections of this guide during onboarding for employees.
Tip: Use mobile proxies with a clear SLA and support. For example, providers like mobileproxy.space offer managed rotation, country selection, and stable uptime. This simplifies scaling.
FAQ
- Question: Can I run multiple stores under one legal entity? Answer: Yes, but isolate brands by domains, emails, payments, profiles, and IPs. Comply with platform conditions and the laws of the country.
- Question: How often should I change the mobile IP? Answer: Do not change without a good reason. Stability at the start is more important. Rotate according to the regulations and document reasons.
- Question: Is a separate ad account required for each brand? Answer: Recommended. Different billings, domains, and pixels reduce risks and simplify analytics.
- Question: What should I do if the payment provider requests additional documents? Answer: Provide proof of address, bank statements, business model description, and return policy. Keep a document package ready.
- Question: Is it permissible to use one domain with subdomains for different brands? Answer: Not recommended. Different domains enhance isolation and reduce the risk of connections.
- Question: How can I check that I haven’t mixed profiles? Answer: In the multi-profile browser, use clear profile names and pin favicons. Establish a rule: one action - in one profile - one entry in the log.
- Question: Where can I read basic material on dropshipping? Answer: Internal material “Dropshipping: From Niche to Launch.” Study this before scaling the multi-store.
- Question: What should I do if the advertising suddenly stops? Answer: Check the domain, billing, pixel events, and login history. Ensure that logins were only made from the “Brand — Ads” profile and through the attached mobile IP.
- Question: What minimum equipment do I need for mobile proxies? Answer: A reliable modem/slot with the provider, stable signal, rational IP rotation protocol, and monitoring. Stability is more important than quantity.
- Question: Can I combine mobile and residential proxies? Answer: Not recommended within the same brand; uniformity is preferable. Different types of networks can create unnecessary discrepancies in logs.
Conclusion
You have completed the full journey from theory to the practical infrastructure of a multi-store in Shopify for dropshipping: understood why related stores get blocked, implemented the scheme “one store = one mobile IP + one profile,” set up geolocation to the store's country and payments, separated ad accounts, and compiled a launch checklist without blocks and a verification system. Now each store leads its own life: a unique domain and brand, isolated profile and IP, coordinated geo-settings, separated payments and advertising. This forms the basis for stable operations, trust from payment and advertising platforms, and comfortable scaling.
What's next: refine catalogs, enhance service quality and processing reputation, extend product lines for each country, conduct A/B tests on storefronts and landing pages, deepen analytics. Maintain documentation to ensure every team member acts by a unified standard.
Where to evolve: automate routine checks, build your own conversion reports, connect additional sales and advertising channels, test new geos, and as you grow, establish backup slots for mobile IPs. If you seek predictability and support, rely on mobile proxy providers with transparent SLAs, like those at mobileproxy.space, and continue following your isolation regulations. Good luck with your scaling!