Setting up targeting parameters on Facebook

Social networks are an extremely popular and sought-after tool among modern users. And this point has long been appreciated by business representatives and marketers. They actively use these platforms to attract new customers, retain the attention of regular customers by launching advertising campaigns on social networks. But the effectiveness of such an idea directly depends on how accurate the targeting parameters are initially set.
All this is relevant for absolutely all social networks, but today we will talk directly about Facebook. This platform attracts the attention of many business representatives, as it presents a solvent audience, people who clearly understand what goods or services they are looking for, those who are ready to make purchases. In particular, Facebook Ads or as it is often called Meta Ads offers a wide range of targeting parameters, which will allow you to accurately target your ads to the people for whom the product was created. This means that your advertising budget will be directed directly to the audience of the site that is interested in such goods, services, excluding its empty spending.
Now let's take a closer look at the entire huge set of targeting tools that are presented today on the Facebook platform, so that you can use them as effectively as possible in your advertising campaigns. Let's talk about the target audience and highlight its main groups. We will tell you how to correctly set the main targeting parameters. We will provide a set of recommendations that will allow you to increase the efficiency of the work performed and get the maximum result at the end.
Launching the targeting settings on Facebook
If you decide to launch advertising on the social network Facebook, pay special attention to setting up the targeting parameters. All this data in Facebook Ads is already directly at the level of setting the ad group at the stage of launching a new campaign. That is, this is the stage that you cannot miss or pass by. And here it is very important to perform these settings as correctly as possible. As soon as you click on the icon with the image of the “+” “Create a new company” a new window will open in front of you, where you will see an item called “Audience Parameters”.
We would like to draw your attention to the fact that initially the platform will offer you quite limited parameters for targeting, since the “Audience Advantage+” option will be activated by default here. It indicates that you completely rely on the system in the process of selecting an audience for your business, that is, that the platform will independently choose who to show your ad to based on basic settings. But we would not recommend using this option, since you risk wasting your budget, receiving in practice the minimum from expectations.
To avoid such mistakes, carefully study our review today. In the afternoon, we will tell you how to set the targeting parameters as accurately and in detail as possible. And the first thing you need to do is to deactivate the automatic audience selection option by clicking on the button “Go to original audience parameters”. Immediately after that, your page will be updated and it will display a full set of all those tools that you can use for the most detailed targeting settings. We will tell you about all this below.
Creating a target audience on Facebook
One of the first steps that will need to be implemented during the setting up of targeting parameters is to choose the most suitable type of audience on Facebook and understand how you can create it. There are several options here, and the main differences are in what exactly all subsequent settings will be based on. In particular, the following varieties are distinguished:
- Custom or special audience.
- Similar audience.
- Detailed targeting.
So that you can understand which option will be most suitable for the advertising campaign being launched, let's consider all these points in more detail.
Special or custom audience on Facebook
Special audiences will be created from those people who have already interacted with your business. Here, the main parameters will be whatever you decide to use. Please note that such audiences must be created directly at the stage of targeting settings, namely at the ad group level. Here, you will need to do the following:
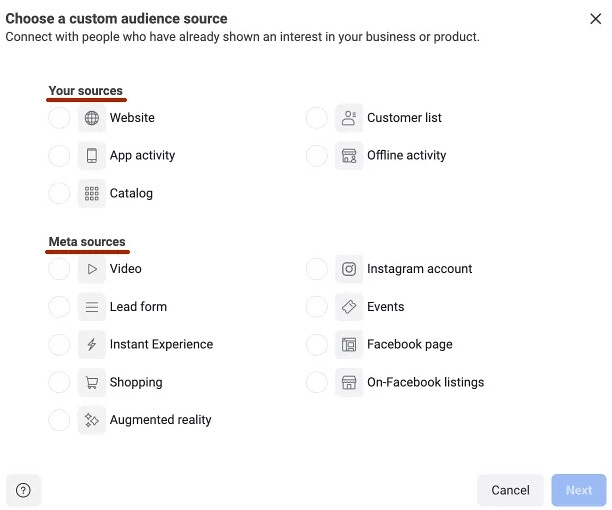
- We select the resources with which your audience interacted. Here we can talk about visiting a website, a product catalog or a regular store, contact information, interaction with your application, using any resources from the Meta corporation. We would like to draw your attention to the fact that in the latter case, your special audience will also be created from those people who have already interacted with your advertising or subscribed to the relevant business pages on social networks Facebook or Instagram. Based on the very specificity of such audiences, they are often called remarketing. And here everything is quite reasonable, since it is targeting directly at people who are familiar with your business in general, and who have previously performed certain target actions, be it subscribing, calling a manager, visiting a resource, using an application, etc. Practice shows that targeting website visitors still gives the greatest results. If you decide to use such a source, then you must initially set up Facebook Pixel on the site. Thanks to this, information from your site will be immediately transferred to the system.

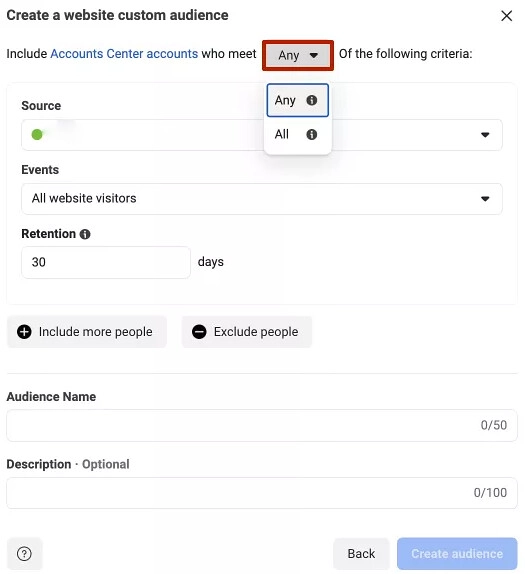
- Configuring the parameters of your new audience. The first thing we want to draw your attention to is that in the logic of the criteria, the default option is selected as "Any". This means that all active accounts that meet at least one of the criteria you set will be taken as a basis here. But by and large, you can change this setting and select the "All" option from the drop-down list. Thanks to this, only those accounts that match all the criteria you set will be included in the selection. That is, this way you will make your audience as narrow as possible and accurately projected onto the campaign being launched. We would like to draw attention to the fact that here we leave the "Any" option.
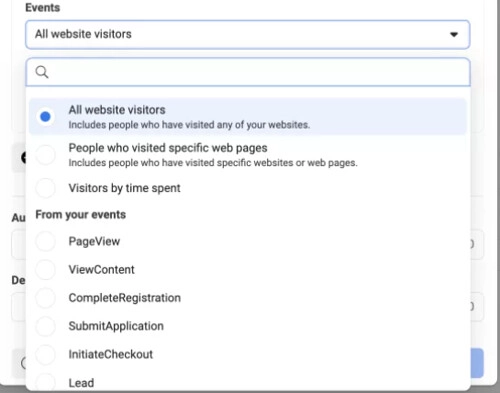
- We enter all the necessary information. Initially, it is necessary to specify the key parameters of the future criterion. Here we select the Facebook pixel that you previously installed on your site, and in the next window we indicate whether you want to target the audience that has already visited your site, those who will be pulled from the added events to your site, or absolutely all visitors to the resource on which you installed the Facebook pixel. In the first case, you need to select the option “People who visited specific pages” from the drop-down list, and “All site visitors” in the second.
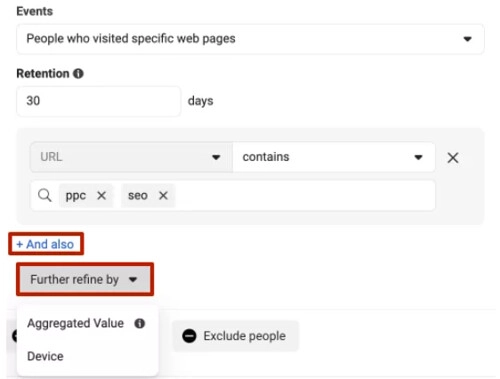
- If you want to target directly people interacting with a specific page, then you will need to specify the corresponding URL. Additionally, you can also enter values that contain, do not contain, and are equal to the address you entered. Here you can add multiple URLs by clicking on the “+And” button. Use the “Additionally specify by” option, specifying the frequency with which the event you specified occurred and even the device that the user used when it happened.
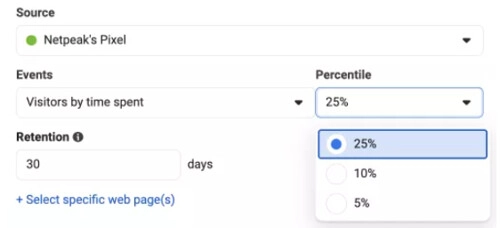
- The last option for setting an audience is “Visitors distributed by time spent”. Using the “Percentile” parameter, you can connect additional pages taking into account what percentage of people by the duration of stay on the site you would like to add to your audience. The lower the number here, the higher the activity of people interacting with you will be. Choose one of 3 options: 5%, 10%, 25%. Also, do not forget to enter the number of days during which information about your audience will be collected in the “Retention” column. The maximum indicator is 180 days, but it is optimal to choose 1 month.
- Next, you just need to add the criteria for matching or excluding your audience. Do not try to make your segment as narrow as possible, because then the correctness of the work may be violated. Finally, we indicate the name of our audience and make a corresponding description, if necessary. You can see that the provided limits are 50 and 100 characters, respectively. Do not neglect the name and description, because even without a more detailed review of the settings, you will be able to understand what exactly is being discussed and you will be able to easily find the corresponding special audience in the general mass. Our recommendation: choose a name in accordance with your basic settings.
To set a custom audience, you can also use the options it provides directly. To do this, you will need to launch this tool, find the “All tools” option in the vertical menu on the left side of the active window and click on it, then select the “Audiences” block on the right side and go to it. Click on the “Create audience” button, then select “Custom audience” and enter all the necessary data. Do not forget to click the “Save” button so as not to lose the settings you have made. We would like to draw your attention to the fact that this is exactly how you will subsequently find all the audiences that you have created earlier.
Similar audiences on Facebook
Lookalike, that is, similar audiences — This is the format of parameters that will be taken from the database of other audiences created earlier. That is, we are talking about special audiences. This means that with their help you will be able to reach those users who have similar interests. To create such an option, you will need to use the "Audiences" tool or make the appropriate settings directly when creating a new advertising campaign.
The process of launching it will be as simple and fast as possible. You will need to do the following work:
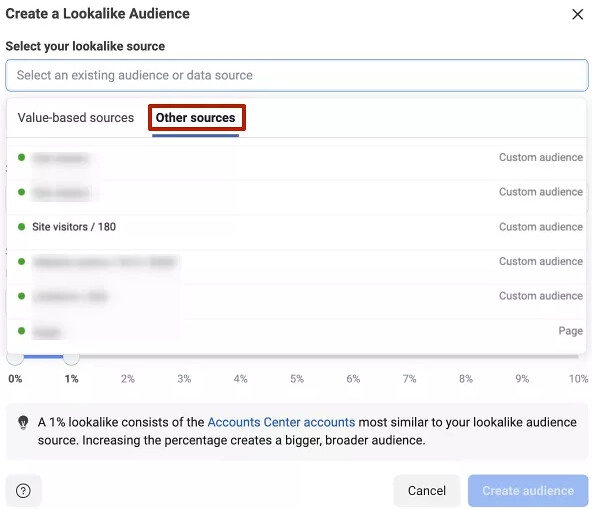
- Click on the "Create audience" button and select the "Similar audience" option from the drop-down list. After that, you will have the opportunity to select the most relevant sources from all those data parameters or audiences that you already have. In particular, events from a pixel provided in the product catalog or directly on the resource itself can be used as data sources. That is, just choose the option that you consider optimal in this case. Here you do not need to click on the "Create a new source" button. If you do this, you will automatically start the process of creating a special audience, which we already talked about at the stage above.
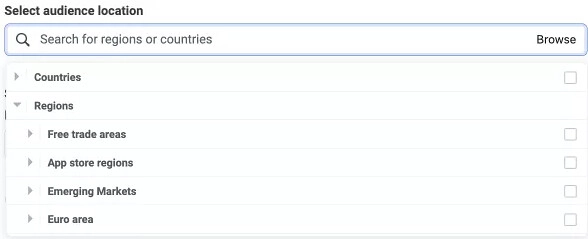
- You already have an audience, after which you just need to indicate which country or region you plan to target when launching your advertising campaign. Here we also simply select the appropriate option from the drop-down list.
- Set the size of your similar audience. It is important to understand that the minimum indicator will indicate the maximum similarity with the original version. That is, if you want to ensure the highest similarity, then you should specify 1%. And the higher the number you choose, the more expanded the audience will become, but its similarity with the original version will gradually decrease. Here you will also have the opportunity to create several audiences based on individual similarity parameters. To do this, click on the «Number of similar audiences» button, specify the required number and the corresponding similarity parameters.
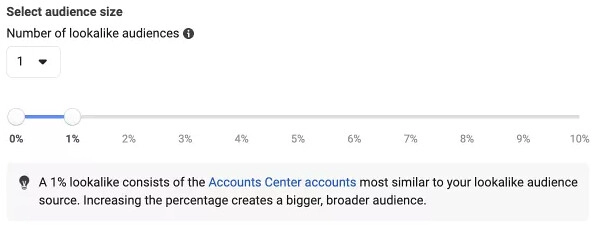
As soon as you complete these steps, the name of your similar audience you created will appear at the very bottom, as well as approximate coverage indicators in the future, that is, after the launch of advertising.
Detailed targeting on Facebook
This is the last version of the audience that can be created based on individual settings of detailed targeting. Its distinctive feature is that it can be based on absolutely any other audiences, including special, similar ones. But you can still create them yourself literally from scratch, setting the most accurate personal parameters.
If you decide to use this option, you will need to find the appropriate block. It is located slightly below the column with the selection of the audience in the section through which you will create a new group of your advertisements. To open all the necessary settings, you should click on the "Edit" button. We would like to draw your attention to the fact that in this case you will be able to add demographic data, information about the interests of the audience, and take into account its behavioral factors.
This targeting option will be more complex and voluminous in settings, but it still gives the best results in practice. These are the points that we will now consider in maximum detail, literally step by step.
Setting targeting parameters on Facebook
By and large, we have now come to the main issue of our review today - the selection and setting of the main parameters for targeting. We have already mentioned above that after setting all the basic parameters, Meta Ads Manager will calculate the approximate number of users that you will be able to attract by launching this advertising campaign. Information about the audience size will be placed on the right side of the working window near the settings. You will need to constantly monitor these figures in order to stick to the "golden mean". In most cases, too small and, conversely, an extremely expanded audience for advertising campaigns is not very good.
Below, we will consider the basic parameters that will need to be set for more detailed targeting settings.
The "Audiences" parameter
At this stage, you need to decide whether you want to create a new audience or use those that you have previously saved, be it a similar or a special audience. If you choose the second option, then all the necessary data will be displayed immediately after you create at least one audience. But here it is important to click on the "Save audience" button in time. By doing this, you save all the settings within this audience. Gradually, this list will be expanded.
Here, the first thing you need to do is click on the "Create Audience" button. If you scroll down a little, you will see 2 possible options: create a new audience from scratch or select one of the options that you previously saved. It is convenient that you can add both special and similar audiences here. To see information about each of them even without going in, hover the cursor over the corresponding block and Facebook Ads Manager will give you basic information, be it the name, potential reach, availability, type.
After you enter the relevant information or pull up a saved audience, the platform will offer to activate the advanced Advantage settings. You can use this tool to connect not only your audience to the settings, but also to start the process of searching for people who meet similar criteria. This means that the coverage will be more voluminous and mass. But we want to warn you that such an action will not be effective in every advertising campaign. That is, here you need to weigh all the "Pros" and “Against”.
“Location” parameter
To add all the necessary targeting settings that are linked to the location of your potential buyers, you need to click on the “Edit” button. Here you can add or delete certain geolocations. As a result, you will be able to form a fairly wide territorial group, including several placements at once. If you click on the “Browse” button, you will be able to manually select the appropriate locations for each country or region. You can also pull here already saved GEO. Using the “Drop pin” button, you can manually put the corresponding point on the map. Don't forget to additionally specify the appropriate radius within which the advertisement you launch will operate.
However, in most cases, a more convenient targeting option will be manual setting of the appropriate parameters, namely:
- country name;
- state or region name;
- city name;
- zip code number;
- specific address.
If you want to scale your advertising campaign, you don't have to specify all this data, but select the entire world or its individual regions. Perhaps there is a business that will use this option.
Age and Gender parameters
Age and Gender — these are some of the main targeting parameters. So, if we talk directly about age, the platform allows you to select potential clients in the range from 18 to 65+ years. Here you just click on the drop-down lists and specify the minimum and maximum age of your audience.
There will also be no difficulties when specifying gender. There are 3 options: “All”, “Men”, “Women”. You just need to put a mark in the circle next to the corresponding name and save the settings.
“Language” parameter
Specifying a suitable language is another mandatory parameter when setting up detailed targeting. We would like to draw your attention to the fact that the “All languages” parameter is initially set by default in Facebook Ads Manager. But you can still choose the most suitable languages for yourself from the 48 options presented. You shouldn't bother too much with this question. You can leave the settings that are here by default. The thing is that the platform will still use the language that is common in the corresponding region when showing ads to people. And this means that you will be able to maintain the widest possible audience reach.
But if we are talking about some atypical languages presented in a particular region, then you should still make an appropriate choice. Let's say that you want to launch an ad for the British who are currently in or live in Italy. Accordingly, English will not be very common in this country, that is, by default, the system would choose Italian. But if you specify English here, then Facebook Ads Manager will display ads in it even in Italy.
More detailed targeting parameters
We also recommend setting more detailed targeting parameters. In this case, we are talking about taking into account demographic, behavioral factors, as well as the interests of the target audience. We would like to draw your attention to the fact that you can either add these parameters or, conversely, exclude them from the settings. We have already mentioned above that such opportunities will be available to you after using the Advantage tool. In particular, you will need to select the “Advantage Detailed Targeting” option. This is what will allow you to go beyond the established parameters, attracting not only the main, but also additional audiences.
To take advantage of such opportunities, click on the “Browse” button. In the drop-down list, you will see all the options that you can use for detailed targeting settings. You can also simply start typing the appropriate word or phrase in the Facebook Ads Manager search bar, such as “Education,” “Income Level,” etc. Right after that, a list of relevant offers will open. When you hover over one of the criteria, more detailed information about the approximate size of the audience that matches your criteria will open.
You can vary these parameters, choose different interests, behavioral factors, demographic indicators, and ultimately get an audience portrait that best suits the specifics of your business and the goals you set for yourself when launching this advertising. Moreover, you can choose the optimal combination of the number of people attracted, while maintaining the “golden mean” that we already talked about above. If, after selecting several settings options, you click on the “Recommendations” button, you will receive the relevant information from the platform regarding the most detailed parameter options. This is what will make it easier to find the optimal balance later.
Once all the data is set, you will need to add the created audience to the saved ones, which will allow you to use these parameters in subsequent work.
Choosing an ad placement
Facebook Ads Manager provides many settings that are included here by default. This is also relevant for placements. In particular, an option such as “Advantage+ Placements” is automatically provided here, which involves automatic selection of placement locations for the future ad by the platform's algorithms so that it is seen by as many people as possible. Moreover, the system automatically redistributes the budget, directing maximum funds to where the efficiency will be highest. But again, you do not have to use the standard settings. You can do everything yourself by selecting the “Manual placements” option.
If you choose this option, you will first be able to select the devices on which the ad will be displayed, in particular, separately marking smartphones and computers. You can also manually select the platforms for placement, activating those that will be relevant to you and unmarking those platforms that you do not plan to use this time. That is, you just go to the appropriate sections and exclude unnecessary things in each of them.
If you click on the “Show other parameters” button, you will be able to make clarifying settings, as an option, specify the type of operating system of the computer or smartphone that is suitable for you.
You can also manually configure indicators that are directly related to security, as well as to the compliance of the content with the specifics of the business itself. In particular, we are talking about the following indicators:
- List of blocks. Here we are talking about specifying the sites where your ads will not be shown. Here you should add everything that you consider unacceptable for your business at this point in time.
- Assortment filtering. With these settings, you can monitor all the information that will be displayed in the immediate vicinity of your ad, depending on its location. That is, you can specify the categories of products or services whose advertising you would not like to see next to yours.
- Prohibited content formats. Here you can set a ban on displaying your ads on certain pages, profiles, placements. We would like to draw your attention to the fact that today Facebook offers a list of publishers, pages that have connected monetization (Publisher list Facebook). That is, you can set a ban on displaying ads in any other videos.
Additional recommendations for setting up targeting on Facebook
To ensure that your work on setting up targeting when launching advertisements on the social network Facebook justifies your expectations and the funds invested, take into account the following recommendations from experts.
We give preference to custom audiences over similar ones in remarketing
Custom audiences are the format for setting up settings that is ideal for launching remarketing, including dynamic. That is, the subsequent attraction of people who have already interacted with your business will be carried out on the basis of information collected from various sources and resources. This is what will allow you to run tests of different audiences, combine them with each other, while tracking their effectiveness. As a result, you will be able to bet on those ads that actually give the best results in a particular case.
In any case, you need to clearly distribute remarketing and non-remarketing audiences. The former are ideal for unobtrusively pushing a client or a person who viewed your products, consulted with managers to repeat a particular target action. And ads that are targeted at them should be fundamentally different from those that will be launched on people who have never heard of your brand before.
But here you should act very carefully, because there is a risk that your ad will be shown to the same person at different stages of the sales funnel, causing dissatisfaction. Moreover, by your careless actions you can make your ads compete with each other, which will automatically lead to an increase in the bid and advertising costs, but will not give the desired result.
Using Audience Insights
Audience Insights is a fairly advanced tool that allows you to collect general information about the audience on the Facebook social network. This also applies to your competitors' clients. As a result, you will have information at your disposal that can be used at the stage of creating new segments or their subsequent testing. To use this tool, you need to:
- In the vertical left menu of Facebook Ads Manager, select the option “All tools”, and in the window that opens, find the section “Statistics and reports”. Here we are interested in such a tool as “Audience statistics”. In it, you will find detailed information about your current audience, as well as about your competitors' buyers, that is, about all potential Facebook clients. Evaluate which pages attract people's attention the most, whether this is more relevant for men or women, users from which regions are leading here, etc.
- Clear all the filters that were set earlier, and enter your competitor in the line of interests. Yes, here in the interests you will not see small companies, but large brands working in the same niche as you will definitely be displayed here. You will be able to study the audience and, based on the information received, make the most accurate settings for yourself. Before launching, it is better to test such audiences, and if the results seem successful, you will just need to click on the "Create audience" button, thereby saving all the settings at once.
- Use various filters, analyze the results, adapt the information received to the specifics of your business, conduct various tests. This is what will allow you to perform the upcoming settings as quickly and easily as possible and ensure maximum results in the end.
However, we do not recommend relying entirely on the data obtained. The test audience does not always give the same impressive results in practice. This means that you should use these features as a hint, excluding thoughtless use.
Targeting an audience that purchased products through Facebook advertising
Here we are talking about the fact that you have the opportunity to direct your ads directly to those users who made a purchase on Facebook by clicking on the "Buy Now" button directly during the ad display. This can be done by activating the "Engaged Buyers" option at the stage of setting up detailed targeting.
The main focus should be directly on the last purchase of a specific person. It will also not be superfluous to add the topic of the product itself to the interests. This is what will allow you to target people who most often buy relevant products. This means that your attention will be focused on people who perform conversion actions.
Launching experiments with "similar" audiences
Before launching an ad, it would be a good idea to experiment with similar audiences, choosing different match percentages each time. Let us repeat that the higher the number you set in the settings, the less similar the attracted audience will be in the end, and vice versa. So, in order to add more details to such an audience, to narrow it, you need to enter additional parameters for detailed targeting. So, let's assume that you have a set of users with 2%, as well as with 7% similarity. As a result, you need to completely exclude 2% from the 7% audience, which will prevent them from overlapping. And so you can play around almost endlessly, forming different audiences from the same tool, which will ultimately allow you to launch different ads for each of them.
We also want to draw attention to the fact that in similar audiences you do not need to make any exceptions, because the main task here is — this is working with volumes.
Connecting multi-level targeting
We are talking about creating decentralized profiles of the target audience. Thanks to this, you will be able not only to create, but also to test different audiences, set individual settings for each of them, segment them. As a result, it becomes possible to detail the targeting, operating parameters as much as possible, and increase their uniqueness. But here it is very important to understand that in parallel with adding small details, you will narrow the overall coverage. The fact is that the system will select only users who meet each of the specified criteria in your settings.
For the sake of interest, you can also try to combine several unique audiences. Let's say that you want to launch an ad for running shoes. As a result, you can set one interest for the "sneakers" category and combine it with "running" using the "and" parameter. As a result, you will get an ad aimed at selling running shoes. This means that you will be able to attract people interested in this particular purchase.
Let's sum it up
Launching advertising campaigns through the Facebook Ads Manager platform allows you to take into account a huge number of different parameters when setting up targeting. We hope that the information provided in our review allowed you to get to know this issue in more detail and understand how to make the appropriate settings in order to get maximum efficiency and the best results. Moreover, you will have the opportunity to test different audience options, settings, justifying the invested efforts and funds.
The last point that I would like to draw your attention to is the presence of certain limitations when working with this advertising platform, and the Facebook social network itself. To bypass them, get stable access to the platform and tools, avoid unauthorized access, maintain high levels of confidentiality, and be able to use tools that automate some of the same-type and routine work, we recommend that you additionally connect mobile proxies from the MobileProxy.Space service to your work. At the link https://mobileproxy.space/en/user.html?buyproxy you can find out useful and detailed information about this product, evaluate the availability of tariffs, the variety of geolocations, and also take advantage of free testing.
If you encounter technical difficulties in working with mobile proxies, have additional questions, or need to consult with specialists, please contact the technical support service, which operates around the clock.